Posted on Leave a comment

How to implement Managed Identity on Service Fabric

Workloads deployed in Service Fabric clusters require Azure AD application credentials or managed identities to access Azure AD protected resources, such as Azure Key Vault and storage accounts. In case of Azure AD applications one can create a new app registration then assign permissions from Access control and finally use the client secret of this application inside the service fabric service.

If you need to enhance security and built based on well architected framework principles you can integrate managed identity authentication inside service fabric applications. Typically when you need to deploy an application on service fabric you should connect to the cluster and deploy using powershell commands. If you want to use managed identity it’s a whole different procedure and the first thing that needs to be changed is the deployment of the service inside the sf cluster.

The high level diagram can be found below.

It is mandatory to deploy the service fabric application as an arm template in order to enable managed identity. There is no other way to implement managed identity authentication except from arm templates.

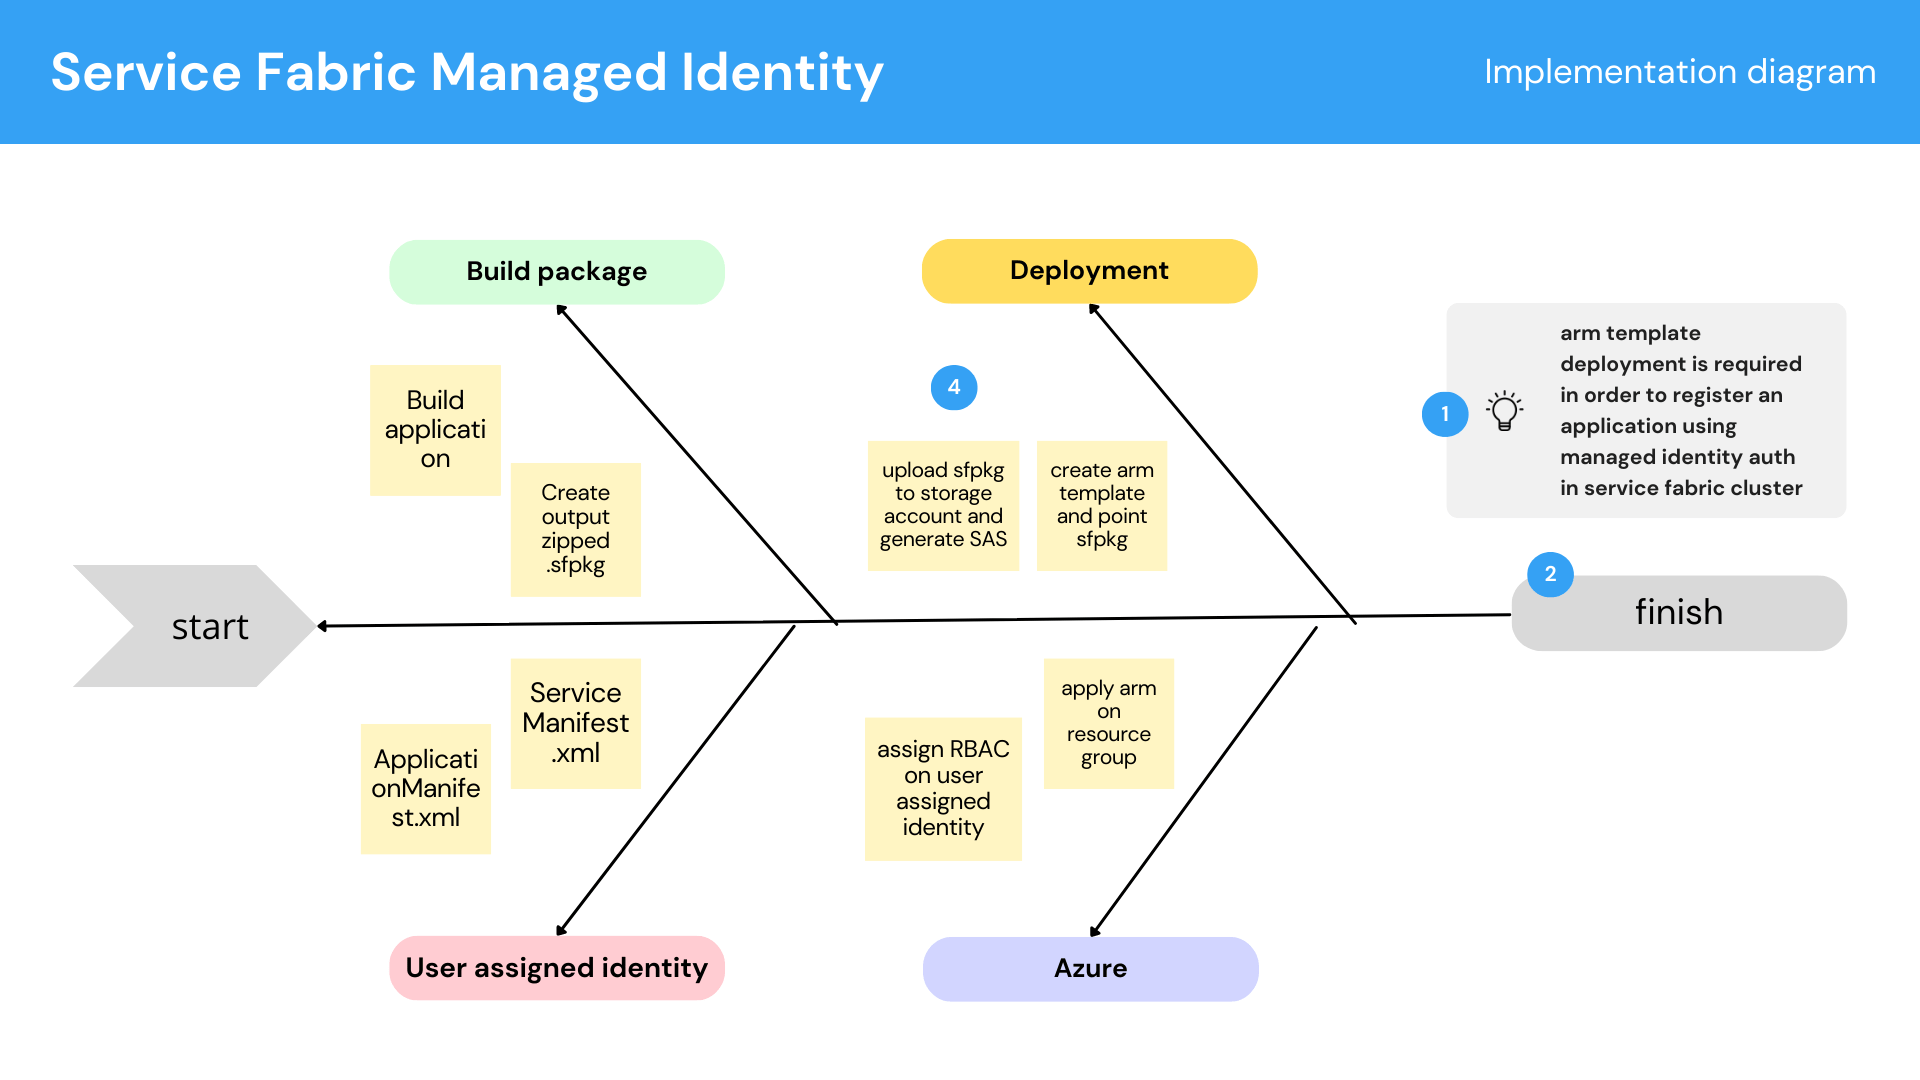
In more detail there are some steps that need to be performed for the deployment:

  • some references for the user assigned managed identity should be added inside service fabric application in ServiceManifest.xml and ApplicationManifest.xml
  • the output package after the build should be bundled in a sfpkg zip format
  • the package should be uploaded in a storage account and it should be accessible from service fabric cluster (sas token)
  • an arm template should be created with some necessary information for the deployment such as application type and version, packageUrl, cluster name, managed identity name etc.
  • arm template should be applied in service fabric cluster resource group

Service fabric cluster configuration

ManagedIdentityTokenService should be enabled on Service Fabric cluster.

https://learn.microsoft.com/en-us/azure/service-fabric/configure-existing-cluster-enable-managed-identity-token-service

Azure configuration

  • Given that you have already created a user assigned Managed Identity you will need to add some references inside the service fabric application.

ApplicationManifest.xml

 <Principals>
    <ManagedIdentities>
      <ManagedIdentity Name="userassignedMI" />
    </ManagedIdentities>
  </Principals>
    <Policies>
      <IdentityBindingPolicy ServiceIdentityRef="SFServiceUser" ApplicationIdentityRef="userassignedMI" />
    </Policies>

ServiceManifest.xml

<ManagedIdentities DefaultIdentity="SFServiceUser">
    <ManagedIdentity Name="SFServiceUser" />
</ManagedIdentities>

https://learn.microsoft.com/en-us/azure/service-fabric/how-to-deploy-service-fabric-application-user-assigned-managed-identity

  • Then the appropriate RBAC should be assigned on the user assigned managed identity which is referenced inside service fabric application.

Code

In our code we can authenticate using Managed Identity instead of a connection string (DefaultAzureCredential class will automatically locate the managed identity configuration and use it).

var blobServiceClient = new BlobServiceClient( new Uri("https://storage.blob.core.windows.net"), new DefaultAzureCredential());

Deployment

The final step would be to deploy the application. Apply arm-template.json to create the SF service.

 az deployment group create --name sfdeployment --resource-group rgofsfcluster --template-file servicefabric-arm.json

Finally application will be created on service fabric cluster using arm templates supporting managed identity authentication.

Posted on Leave a comment

Enforce Azure policy on virtual machines

On previous articles I have used Azure policy to enforce and inherit tags on azure resources.

However sometimes you need to enforce Azure policy only on specific resources. For this purpose you can use logical expression. Lets examine how we can apply an azure policy only on virtual machine resources. Under the policy rule, you will need to search for the field that equals Microsoft.Compute/virtualMachines. By doing so you can target only the specific resource and then based on your logic you can perform actions.

    "policyRule": {
      "if": {
        "allOf": [
          {
            "field": "type",
            "equals": "Microsoft.Compute/virtualMachines"
          },
          {
            "field": "[concat('tags[', parameters('something'), ']')]",
            "exists": "false"
          }
        ]
      },
      "then": {
        "effect": "audit"
      }
    }
  },

In the above scenario the policy rule evaluates to true and audits when a tag named something does not exist and the resource is a virtual machine.

Posted on Leave a comment

Tasks, jobs, stages templates combined for Azure DevOps

In this article we will examine the power of templates for Azure DevOps pipelines. Templates let you define reusable content, logic, and parameters and function in two ways. You can insert reusable content with a template or you can use a template to control what is allowed in a pipeline.

When you build complex automation scenarios for your organizations, you will need to use stages, jobs and tasks as they would contain multiple environments and configuration settings.

You can find some of the reasons why you would need to follow this approach on my previous article

In this article we will examine a azure devops pipeline which contains stages, jobs and tasks. Those will be created inside templates and they will be called from the main pipeline. A high level view of the architecture can be found in the below picture.

My code structure is shown below. There is a folder for the appropriate templates and a main pipeline which is located in another folder and will refer the templates folder.

stage.yml
The stage.yml file will contain the template code for the stages. It has as parameter the name which will be given in the stage.

parameters:
  name: ''

stages:

- stage: ${{ parameters.name }}
  jobs:    
  - template: job.yml
    parameters:
      name: ${{ parameters.name }}_build_job

job.yml
The job.yml file will contain the template code for the jobs. It has as parameter the name which will be given in the job and also a variable sign which will indicate if a task will be executed.

parameters:
  name: ''
  sign: false

jobs:

- job: ${{ parameters.name }}
  displayName: running ${{ parameters.name }} 
  steps:

  - template: step.yml
    parameters:
      name: task1

  - ${{ if eq(parameters.sign, 'true') }}:
    - script: echo sign is requested
      displayName: sign task

step.yml
The step.yml file will contain the template code for the steps. It has as parameter the name which will be given in the task.

parameters:
  name: ''

steps:

- script: echo ${{ parameters.name }}
  displayName: running  ${{ parameters.name }}

main.yml
The main.yml file is the main reference of the pipeline and the one that will be called. If you need to add more stages on it, you would only have to add another -template section under the stages.

trigger:
- none

variables:
- template: templates/vars.yml  
pool:
  vmImage: $(myagent)

stages:
- template: templates/stage.yml  
  parameters:
    name: "App_Env1"

By executing the pipeline we can locate that we have one stage that is not visible (as it is the only one) and under this stage a job has been created for the task1 which we added on our template.

Find more about azure devops templates on my Udemy course:

Mastering Azure Devops CI/CD Pipelines with YAML | Udemy

Posted on Leave a comment

Azure Keyvault Managed Identity C#

In the below .NET 6 example you can find how to get secrets from a keyvault using Managed Identity in order to secure communication between resources.

There are two packages required for this accomplishment.

https://www.nuget.org/packages/Azure.Identity

https://www.nuget.org/packages/Azure.Security.KeyVault.Secrets

Code:

using Azure.Identity;
using Azure.Security.KeyVault.Secrets;

const string managedIdentityIdentifier = "Id";
const string secretName = "secretName";
const string keyVaultUrl = "Url";

var client = new SecretClient(vaultUri: new Uri(keyVaultUrl), credential: new ManagedIdentityCredential(managedIdentityIdentifier));
var secret = client.GetSecret(secretName);

Console.WriteLine("retrieving secret value using managed identity: " + secret.Value.Value);