Many times you need to provide values in provider information when using terraform. Lets take as an example the below code block. The azuredevops provider needs some variables in order to deploy successfully and we need to pass those values as secrets because they contain sensitive information.
We should never hardcode such information in the application as this information may get leaked. In order to pass those as secrets we will need to create a variable group or standalone variables and place the secrets there.
Then we will need to create some terraform variables and pass the values for those through the pipeline.
variable "org_service_url" {
  description = "The URL of your Azure DevOps organization."
}

variable "personal_access_token" {
  description = "The personal access token for authentication."
}
If you work everywhere as a code you will probably need to check Azure DevOps terraform provider. It is created and maintained from Microsoft and you can use it in order to have your DevOps tool as a code.
In order to getting started you will need to create a PAT token and give it the access based on the actions that you need to do.
When the token is ready you will need to set two environmental variables on the machine that you work. The first one is AZDO_PERSONAL_ACCESS_TOKEN which should be your token. The second one will be your org URL AZDO_ORG_SERVICE_URL
Finally you are ready to deploy your IAC Azure DevOps configurations.
Lets see the below example.
# Make sure to set the following environment variables:
#   AZDO_PERSONAL_ACCESS_TOKEN
#   AZDO_ORG_SERVICE_URL
terraform {
  required_providers {
    azuredevops = {
      source = "microsoft/azuredevops"
      version = ">=0.1.0"
    }
  }
}

resource "azuredevops_project" "project" {
  name = "My Awesome Project"
  description  = "All of my awesomee things"
}

resource "azuredevops_git_repository" "repository" {
  project_id = azuredevops_project.project.id
  name       = "My Awesome Repo"
  initialization {
    init_type = "Clean"
  }
}

resource "azuredevops_build_definition" "build_definition" {
  project_id = azuredevops_project.project.id
  name       = "My Awesome Build Pipeline"
  path       = "\\"

  repository {
    repo_type   = "TfsGit"
    repo_id     = azuredevops_git_repository.repository.id
    branch_name = azuredevops_git_repository.repository.default_branch
    yml_path    = "azure-pipelines.yml"
  }
}
When above code runs it will create a new project with the name My Awesome Project. Inside the project a new git repo will be initialized and a new pipeline will be created inside this repository.
A common challenge for developers is the management of secrets, credentials, certificates, and keys used to secure communication between services. Managed identities eliminate the need for developers to manage these credentials.
There are two types of managed identities:
System Assigned
User assigned
You can learn more about how managed identity works from the below guide.
In this demonstration we will examine how we can use managed identity to authenticate with a storage account from a .NET application. This is very useful when dealing with security as we eliminate access to specific resources and we do not have to manage passwords in the code.
In order to implement Managed Identity it should be supported for the specific resource. This example is an ASP .NET web app that is deployed on a app service and uses managed Identity to communicate with a storage account and get blob data or information.
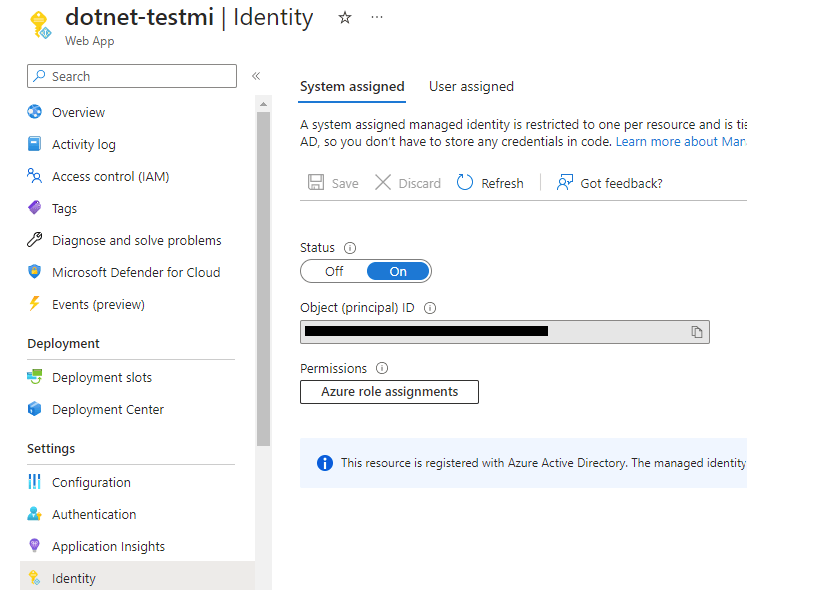
Firstly the managed identity object should be enabled on the web app. This means that you enable the web app to request when needed managed identity authentication from Azure AD.
Then you will need to enable the specific role that is required on the identity resource. As you can see from the image, I assigned the Storage Blob Data Reader, as I only need to perform read actions (least privilege) on the dotnet-testmi identity which is identified by azure with the App Service Label. When you enable the managed identity on a resource it will connect with an object ID which is then the identified on the whole azure portal. You can search later on with this ID or the name of the resource from the IAM of the destination resource. This means that you have to assign the permissions on the Blob Container of the Storage account that you need to access through code.
Finally you you will need to use Managed Identity Authentication in your code.
In this example two libraries are needed in order to interact with the storage account using managed identity. First the Azure.identity which includes Managed Identity Authentication and also Azure.Storage library.
Authenticate using Managed Identity instead of a connection string
BlobContainerClient client = new BlobContainerClient(new Uri($"https://NAME.blob.core.windows.net/testing"), new ManagedIdentityCredential());
Authentication using connection string
BlobContainerClient client = new BlobContainerClient("connectionString","testing");
When creating a blank ASP .NET application you will have a WeatherController built by default to start experimenting. The code for this example is added there for the case of simplicity and you can find it below.
using Azure.Storage.Blobs.Models;
using Azure.Storage.Blobs;
using Azure;
using Microsoft.AspNetCore.Mvc;
using Azure.Identity;

namespace WebApplication1.Controllers
{
    [ApiController]
    [Route("[controller]")]
    public class WeatherForecastController : ControllerBase
    {

        private readonly ILogger<WeatherForecastController> _logger;

        private static List<string> _blobList;
        public WeatherForecastController(ILogger<WeatherForecastController> logger)
        {
            _logger = logger;
        }

        [HttpGet(Name = "GetWeatherForecast")]
        public IEnumerable<string> Get()
        {
         BlobContainerClient client = new BlobContainerClient(new Uri($"https://NAME.blob.core.windows.net/testing"), new ManagedIdentityCredential());

            ListBlobsFlatListing(client, 1).GetAwaiter().GetResult();
            return _blobList.ToArray();
        }


        private static async Task ListBlobsFlatListing(BlobContainerClient blobContainerClient,
                                               int? segmentSize)
        {
            try
            {
                _blobList = new List<string>();
                // Call the listing operation and return pages of the specified size.
                var resultSegment = blobContainerClient.GetBlobsAsync()
                    .AsPages(default, segmentSize);

                // Enumerate the blobs returned for each page.
                await foreach (Page<BlobItem> blobPage in resultSegment)
                {
                    foreach (BlobItem blobItem in blobPage.Values)
                    {
                        Console.WriteLine("Blob name: {0}", blobItem.Name);
                        _blobList.Add(blobItem.Name);
                    }

                    Console.WriteLine();
                }
            }
            catch (RequestFailedException e)
            {
                Console.WriteLine(e.Message);
                Console.ReadLine();
                throw;
            }
        }


    }
}
Managed identity is the best practice regarding security when accessing resources on Azure. There are many ways you can use it for service to service communication. Sometimes though you can use nested managed identity in more complex scenarios like the one demonstrated below. In this guide we will enable managed identity on a virtual machine and we will access this managed identity within a container that runs on that specific virtual machine. This case can be useful in complex deployment scenarios where you have multiple containers inside a virtual machine and you want to deploy using managed identity on azure.
The first thing you will need is the system assigned managed identity on the virtual machine.
Then you can run your containers inside the virtual machine. In my case the containers are windows based as a result I will use the route print command to show the routing table.
Run the following Commands to expose the managed identity endpoint
After the successful add of the route the managed identity endpoint should be redirected in the gateway and from there you will be able to authenticate.
We can verify the procedure by executing a key vault managed identity secret retrieval.