A common challenge for developers is the management of secrets, credentials, certificates, and keys used to secure communication between services. Managed identities eliminate the need for developers to manage these credentials.
There are two types of managed identities:
- System Assigned
- User assigned
You can learn more about how managed identity works from the below guide.
https://learn.microsoft.com/en-us/entra/identity/managed-identities-azure-resources/overview
On a previous article I have documented how managed identity can be used inside an azure web app.
In this demonstration we will examine how we can use managed identity to authenticate with a storage account from a .NET application. This is very useful when dealing with security as we eliminate access to specific resources and we do not have to manage passwords in the code.
In order to implement Managed Identity it should be supported for the specific resource. This example is an ASP .NET web app that is deployed on a app service and uses managed Identity to communicate with a storage account and get blob data or information.
Firstly the managed identity object should be enabled on the web app. This means that you enable the web app to request when needed managed identity authentication from Azure AD.
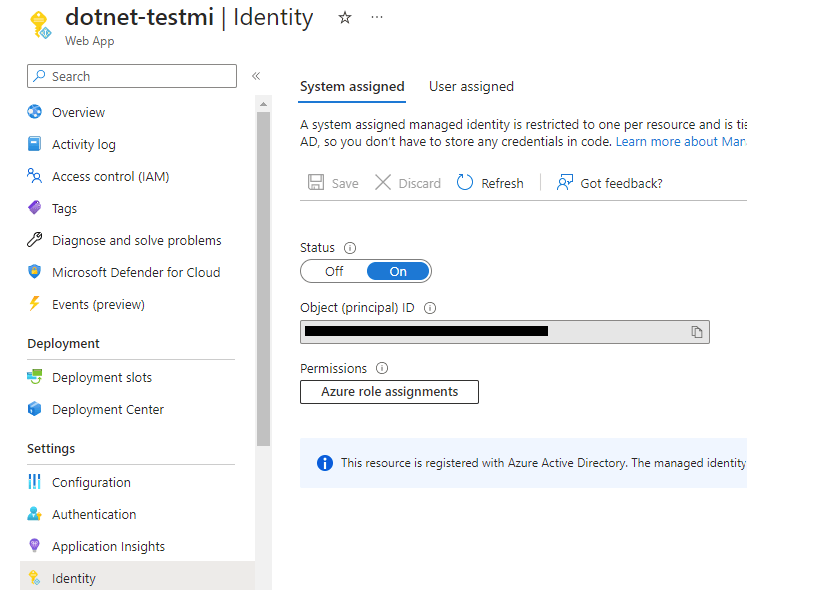
Then you will need to enable the specific role that is required on the identity resource. As you can see from the image, I assigned the Storage Blob Data Reader, as I only need to perform read actions (least privilege) on the dotnet-testmi identity which is identified by azure with the App Service Label. When you enable the managed identity on a resource it will connect with an object ID which is then the identified on the whole azure portal. You can search later on with this ID or the name of the resource from the IAM of the destination resource. This means that you have to assign the permissions on the Blob Container of the Storage account that you need to access through code.

Finally you you will need to use Managed Identity Authentication in your code.
In this example two libraries are needed in order to interact with the storage account using managed identity. First the Azure.identity which includes Managed Identity Authentication and also Azure.Storage library.
https://www.nuget.org/packages/Azure.Identity
https://www.nuget.org/packages/Azure.Storage.Blobs
Authenticate using Managed Identity instead of a connection string
BlobContainerClient client = new BlobContainerClient(new Uri($"https://NAME.blob.core.windows.net/testing"), new ManagedIdentityCredential());
Authentication using connection string
BlobContainerClient client = new BlobContainerClient("connectionString","testing");
When creating a blank ASP .NET application you will have a WeatherController built by default to start experimenting. The code for this example is added there for the case of simplicity and you can find it below.
using Azure.Storage.Blobs.Models;
using Azure.Storage.Blobs;
using Azure;
using Microsoft.AspNetCore.Mvc;
using Azure.Identity;

namespace WebApplication1.Controllers
{
    [ApiController]
    [Route("[controller]")]
    public class WeatherForecastController : ControllerBase
    {

        private readonly ILogger<WeatherForecastController> _logger;

        private static List<string> _blobList;
        public WeatherForecastController(ILogger<WeatherForecastController> logger)
        {
            _logger = logger;
        }

        [HttpGet(Name = "GetWeatherForecast")]
        public IEnumerable<string> Get()
        {
         BlobContainerClient client = new BlobContainerClient(new Uri($"https://NAME.blob.core.windows.net/testing"), new ManagedIdentityCredential());

            ListBlobsFlatListing(client, 1).GetAwaiter().GetResult();
            return _blobList.ToArray();
        }


        private static async Task ListBlobsFlatListing(BlobContainerClient blobContainerClient,
                                               int? segmentSize)
        {
            try
            {
                _blobList = new List<string>();
                // Call the listing operation and return pages of the specified size.
                var resultSegment = blobContainerClient.GetBlobsAsync()
                    .AsPages(default, segmentSize);

                // Enumerate the blobs returned for each page.
                await foreach (Page<BlobItem> blobPage in resultSegment)
                {
                    foreach (BlobItem blobItem in blobPage.Values)
                    {
                        Console.WriteLine("Blob name: {0}", blobItem.Name);
                        _blobList.Add(blobItem.Name);
                    }

                    Console.WriteLine();
                }
            }
            catch (RequestFailedException e)
            {
                Console.WriteLine(e.Message);
                Console.ReadLine();
                throw;
            }
        }


    }
}