Posted on Leave a comment

Azure batch run task with container image through az cli and json rest api

Azure Batch can be a great tool for instant batch processing as it creates and manages a pool of compute nodes (virtual machines), installs the applications you want to run, and schedules jobs to run on the nodes. The important thing using this service is that there is no additional charge for using Batch. You only pay for the underlying resources consumed, such as the virtual machines, storage, and networking.

Azure Batch documentation – Azure Batch | Microsoft Learn

In this post I will demonstrate how one can create a new job and task from az cli for batch service. The trick in this implementation will be the json that is provided as input for the task definition as not all available options are provided from az cli.

The available az cli options are shown below.

https://learn.microsoft.com/en-us/cli/azure/batch/task?view=azure-cli-latest#az-batch-task-create

One important missing configuration will be the container image that can be provided in the task trough Azure portal but not with az cli.

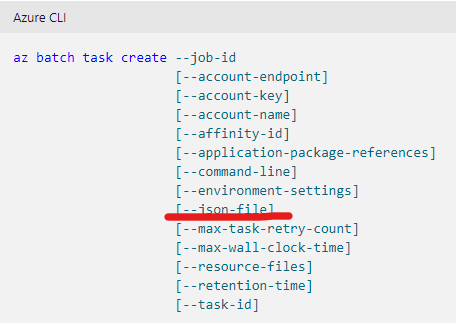
In order to create a task using az cli and bypass this issue, you can use the json-file parameter. This option will trigger the creation using the rest api and provide the parameters for the container image.

When there is a batch service pool available, you will need to create a job.

az batch account login -g RESOURCE_GROUP -n NAME
az batch job create --id JOB_NAME --pool-id POOL_NAME

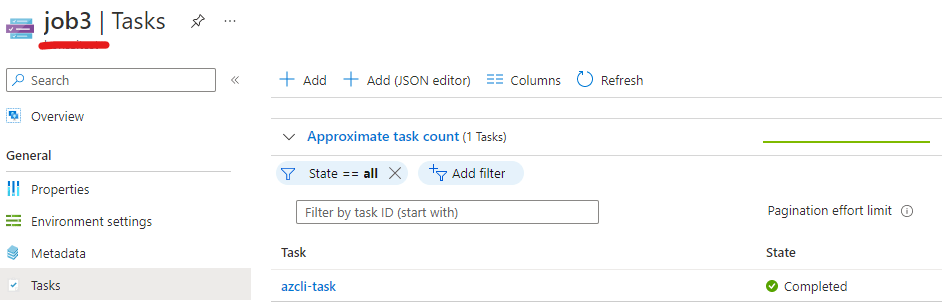
Then you can create a new task using a json file.

az batch task create --job-id JOB_NAME --json-file

Task – Add – REST API (Azure Batch Service) | Microsoft Learn

The JSON file can be created as shown below.

{   
  "id": "azcli-task",
  "displayName": "azcli-task",
  "commandLine": "azcli-task",
  "containerSettings": {
    "containerRunOptions": "--rm --workdir /app",
    "imageName": "registry.azurecr.io/batchcontainer"
  }
}

When you execute the command you will get an output from the rest API for the created task.

output omitted

Finally you can find the new created task on Azure portal.

Posted on Leave a comment

Execute powershell command without username password on Azure virtual machine

You can use az cli task on Azure devops in order to execute a powershell command inside a virtual machine without having to connect on it with username and password. In order to do that you have to use AzureCLI task and invoke a RunPowerShellScript.

    - task: AzureCLI@2
      displayName: execute command inside vm
      inputs:
        azureSubscription: 'subscription'
        scriptType: 'ps'
        scriptLocation: 'inlineScript'
        inlineScript: 'az vm run-command invoke --command-id RunPowerShellScript --name $(vm_name) -g $(vnet_rg_name) --scripts "hostname"'

You should use your own variables regarding the vm_name and rg_name. This task will execute on a windows-latest machine and will output the hostname of the machine that is given as input with the variables.

Posted on 1 Comment

Deploy windows and linux virtual machines on Azure using terraform

Terraform is one of the best automation providers for DevOps purposes used by hundred of Engineers. It is an open source tool that can be used by anyone for free. In this article I will explain how to deploy windows and linux virtual machines on Azure using a Terraform template.

First things first you will need to have the az cli installed. Then you will have to set your subscription on your current powershell session.

az account set --subscription "12abc123-4567-1234-12345-asdr4334fsd"

Then you will need to create an app role assignment for your subscription. This will be used from terraform for the provision of the resources.

az ad sp create-for-rbac --role="Contributor" --scopes="/subscriptions/12abc123-4567-1234-12345-asdr4334fsd"

That’s all. You can now deploy your resources through terraform. In the links below I have provided my Github repository along with instructions for the template use.

A tricky part of the deployment is the vm image selection. In order to locate the available azure images names you can use:

az vm image list

Enumeration of available images:

[
  {
    "offer": "CentOS",
    "publisher": "OpenLogic",
    "sku": "7.5",
    "urn": "OpenLogic:CentOS:7.5:latest",
    "urnAlias": "CentOS",
    "version": "latest"
  },
  {
    "offer": "debian-10",
    "publisher": "Debian",
    "sku": "10",
    "urn": "Debian:debian-10:10:latest",
    "urnAlias": "Debian",
    "version": "latest"
  },
  {
    "offer": "flatcar-container-linux-free",
    "publisher": "kinvolk",
    "sku": "stable",
    "urn": "kinvolk:flatcar-container-linux-free:stable:latest",
    "urnAlias": "Flatcar",
    "version": "latest"
  },
  {
    "offer": "openSUSE-Leap",
    "publisher": "SUSE",
    "sku": "42.3",
    "urn": "SUSE:openSUSE-Leap:42.3:latest",
    "urnAlias": "openSUSE-Leap",
    "version": "latest"
  },
  {
    "offer": "RHEL",
    "publisher": "RedHat",
    "sku": "7-LVM",
    "urn": "RedHat:RHEL:7-LVM:latest",
    "urnAlias": "RHEL",
    "version": "latest"
  },
  {
    "offer": "SLES",
    "publisher": "SUSE",
    "sku": "15",
    "urn": "SUSE:SLES:15:latest",
    "urnAlias": "SLES",
    "version": "latest"
  },
  {
    "offer": "UbuntuServer",
    "publisher": "Canonical",
    "sku": "18.04-LTS",
    "urn": "Canonical:UbuntuServer:18.04-LTS:latest",
    "urnAlias": "UbuntuLTS",
    "version": "latest"
  },
  {
    "offer": "WindowsServer",
    "publisher": "MicrosoftWindowsServer",
    "sku": "2019-Datacenter",
    "urn": "MicrosoftWindowsServer:WindowsServer:2019-Datacenter:latest",
    "urnAlias": "Win2019Datacenter",
    "version": "latest"
  },
  {
    "offer": "WindowsServer",
    "publisher": "MicrosoftWindowsServer",
    "sku": "2016-Datacenter",
    "urn": "MicrosoftWindowsServer:WindowsServer:2016-Datacenter:latest",
    "urnAlias": "Win2016Datacenter",
    "version": "latest"
  },
  {
    "offer": "WindowsServer",
    "publisher": "MicrosoftWindowsServer",
    "sku": "2012-R2-Datacenter",
    "urn": "MicrosoftWindowsServer:WindowsServer:2012-R2-Datacenter:latest",
    "urnAlias": "Win2012R2Datacenter",
    "version": "latest"
  },
  {
    "offer": "WindowsServer",
    "publisher": "MicrosoftWindowsServer",
    "sku": "2012-Datacenter",
    "urn": "MicrosoftWindowsServer:WindowsServer:2012-Datacenter:latest",
    "urnAlias": "Win2012Datacenter",
    "version": "latest"
  },
  {
    "offer": "WindowsServer",
    "publisher": "MicrosoftWindowsServer",
    "sku": "2008-R2-SP1",
    "urn": "MicrosoftWindowsServer:WindowsServer:2008-R2-SP1:latest",
    "urnAlias": "Win2008R2SP1",
    "version": "latest"
  }
]

In order to narrow down and find Ubuntu available images (use grep instead of Select-string for Unix environments)

az vm image list-offers -p canonical -l eastus | Select-String name

Ubuntu images names for east us region:

 "name": "0001-com-ubuntu-confidential-vm-experimental",
    "name": "0001-com-ubuntu-confidential-vm-focal",
    "name": "0001-com-ubuntu-confidential-vm-test-focal",
    "name": "0001-com-ubuntu-minimal-focal-daily",
    "name": "0001-com-ubuntu-minimal-groovy-daily",
    "name": "0001-com-ubuntu-minimal-hirsute-daily",
    "name": "0001-com-ubuntu-minimal-impish-daily",
    "name": "0001-com-ubuntu-minimal-jammy-daily",
    "name": "0001-com-ubuntu-private-fips-motorola",
    "name": "0001-com-ubuntu-pro-advanced-sla",
    "name": "0001-com-ubuntu-pro-advanced-sla-att",
    "name": "0001-com-ubuntu-pro-advanced-sla-csw",
    "name": "0001-com-ubuntu-pro-advanced-sla-dd",
    "name": "0001-com-ubuntu-pro-advanced-sla-nestle",
    "name": "0001-com-ubuntu-pro-advanced-sla-servicenow",
    "name": "0001-com-ubuntu-pro-advanced-sla-shell",
    "name": "0001-com-ubuntu-pro-advanced-sla-ub01",
    "name": "0001-com-ubuntu-pro-advanced-sla-unp",
    "name": "0001-com-ubuntu-pro-bionic",
    "name": "0001-com-ubuntu-pro-bionic-fips",
    "name": "0001-com-ubuntu-pro-focal",
    "name": "0001-com-ubuntu-pro-focal-fips",
    "name": "0001-com-ubuntu-pro-hidden-msft-fips",
    "name": "0001-com-ubuntu-pro-microsoft",
    "name": "0001-com-ubuntu-pro-trusty",
    "name": "0001-com-ubuntu-pro-xenial",
    "name": "0001-com-ubuntu-pro-xenial-fips",
    "name": "0001-com-ubuntu-server-eoan",
    "name": "0001-com-ubuntu-server-focal",
    "name": "0001-com-ubuntu-server-focal-daily",
    "name": "0001-com-ubuntu-server-groovy",
    "name": "0001-com-ubuntu-server-groovy-daily",
    "name": "0001-com-ubuntu-server-hirsute",
    "name": "0001-com-ubuntu-server-hirsute-daily",
    "name": "0001-com-ubuntu-server-impish",
    "name": "0001-com-ubuntu-server-impish-daily",
    "name": "0001-com-ubuntu-server-jammy-daily",
    "name": "0002-com-ubuntu-minimal-bionic-daily",
    "name": "0002-com-ubuntu-minimal-disco-daily",
    "name": "0002-com-ubuntu-minimal-focal-daily",
    "name": "0002-com-ubuntu-minimal-xenial-daily",
    "name": "0003-com-ubuntu-minimal-eoan-daily",
    "name": "0003-com-ubuntu-server-trusted-vm",
    "name": "test-ubuntu-premium-offer-0002",
    "name": "Ubuntu15.04Snappy",
    "name": "Ubuntu15.04SnappyDocker",
    "name": "UbuntuServer",

Specific information about an image:

az vm image list -p canonical -l eastus --offer 0001-com-ubuntu-pro-bionic --all --sku pro-18_04-lts

Inside linux or windows folder depending on the resource you want to deploy apply your terraform configuration

terraform init
terraform apply

After the successful run of the terraform script.

In order to delete the environment you can run

terraform destroy

By committing destroy your eight resources that deal with your virtual machine will disappear.

Repository for the code:

https://github.com/geralexgr/terraform-az-lin-win

Video tutorial on YouTube: