Posted on Leave a comment

Containerize a .NET app with Docker and vs code

When you build your application with cloud native technologies you will build microservices on containers instead of monolithic applications. We will now examine how easy is to build a .NET application in a container and run this application on your local machine.

First we will need to create the visual studio solution. I will go through that with visual studio IDE and then I will use vs code. For my microservice I am using a ASP .NET Core web api with default code.

The target framework for the solution will be the latest .NET framework which is version 7. All other settings will be set to defaults.

When you run the app locally with IIsExpress you will be able to access the swagger interface through the port which you defined in the launchSettings.json. 

https://localhost:7057/swagger/index.html

This file can be located under Properties and there you can configure on which port the application will run. In the profiles section under https settings, you can find the default application URL and port. This will be needed in later steps.

Microsoft provides the below documentation in order to create a containerized application that runs on .NET

Build and run an ASP.NET Core app in a container
In this guide you will learn how to: Create a Dockerfile file describing a simple .NET Core service container. Build…code.visualstudio.com

In order to create a microservice based on our vs solution we will need a dockerfile. This can be created automatically with vs code.

In vs code command dialog search for docker add and select docker compose files to workspace.

Then select asp net core.

and after that your operating system. The next step will be to select the exposed port, or otherwise under which port your application will run. There we should provide the port that we found under our launchSettings.json or the one that we configured manually. In my case I will select the default one for the solution which was 7057.

When a popup window appears on the screen you should select add Dockerfile and automatically the build files will be generated.

Dockerfile

Based on my setup I altered two things in the generated Dockerfile. The first thing will be to change configuration to Debug instead of Release. For production environments you will consider using the release build directive. The second thing will be to add an environmental variable ASPNETCORE_ENVIRONMENT inside the container with the value Development.

FROM mcr.microsoft.com/dotnet/aspnet:7.0 AS base
WORKDIR /app
EXPOSE 7057

ENV ASPNETCORE_URLS=http://*:7057
ENV ASPNETCORE_ENVIRONMENT=Development

FROM mcr.microsoft.com/dotnet/sdk:7.0 AS build
WORKDIR /src
COPY ["AspNetWebApi.csproj", "./"]
RUN dotnet restore "AspNetWebApi.csproj"
COPY . .
WORKDIR "/src/."
RUN dotnet build "AspNetWebApi.csproj" -c Debug -o /app/build

FROM build AS publish
RUN dotnet publish "AspNetWebApi.csproj" -c Debug -o /app/publish /p:UseAppHost=false

FROM base AS final
WORKDIR /app
COPY --from=publish /app/publish .
ENTRYPOINT ["dotnet", "AspNetWebApi.dll"]

docker build command

after the build is completed and the image is created you can run a new container locally.

Keep in mind that in order to test your container you should create a port forward from the container to your host. I used the same port for the host so I added the -p 7057:7057

The logs of the container indicate a successful run of the application.

Our application now runs as a microservice container inside the host machine (my laptop). 

We can verify the access to our application using the URL with the swagger.

Youtube video:

Posted on Leave a comment

Insert and retrieve data on Azure cosmos DB – C# SDK

Azure Cosmos DB is a database solution provided from Microsoft Azure that provides 99.999% SLA for enterprise level solutions.

In this article I will demonstrate how you can write a simple .NET application to insert and fetch data from a Cosmos DB.

First things first, you should have already a cosmos DB created. Then you will need to navigate in the keys section on Azure and retrieve your connection keys.

Using data explorer on Azure you can easily create new Databases and Containers. Containers are like Tables, but they also include other entities like Stored Procedures Triggers and User Defined Functions.

In my test I created a new Database named Data on which I created the table Locations. In this location table I wanted to append some location entries, that they will contain Longitude and Latitude.

That is why I created a class inside my Console App named Location

    public class Location
    {
        public Double Longtitude { get; set; }
        public Double Latitude { get; set; }
        [JsonProperty(PropertyName = "id")]
        public string Id { get; set; }
    }

My Program.cs is shown below:

using System;
using System.Threading.Tasks;
using System.Configuration;
using System.Collections.Generic;
using System.Net;
using Microsoft.Azure.Cosmos;
using cosmos;
using System.Timers;
public class Program
{
public static readonly string EndpointUri = "";
public static readonly string PrimaryKey = "";
public static CosmosClient cosmosClient;
public static Database database;
public static Container container;
static async Task Main(string[] args)
{
await GetStartedDemoAsync();
await QueryItemsAsync();
// insert test data with a timer.
//while(true)
//{
// await AddItemsToContainerAsync();
// Thread.Sleep(5000);
//}
}
private static async Task GetStartedDemoAsync()
{
var options = new CosmosClientOptions() { ConnectionMode = ConnectionMode.Gateway };
cosmosClient = new CosmosClient(EndpointUri, PrimaryKey,options);
database = cosmosClient.GetDatabase("Data");
container = database.GetContainer("Locations");
}
private static async Task AddItemsToContainerAsync()
{
cosmos.Location loc = new cosmos.Location
{
Latitude = 12.222222,
Longtitude = 15.555555,
Id = Guid.NewGuid().ToString()
};
ItemResponse<Location> loc_response = await container.CreateItemAsync<Location>( loc, new PartitionKey(loc.Id ));
Console.WriteLine("Created item in database with id: {0} Operation consumed {1} RUs.\n", loc_response.Resource, loc_response.RequestCharge);
}
private static async Task QueryItemsAsync()
{
var sqlQueryText = "SELECT * FROM Items";
QueryDefinition queryDefinition = new QueryDefinition(sqlQueryText);
FeedIterator<Location> queryResultSetIterator = container.GetItemQueryIterator<Location>(queryDefinition);
List<Location> mylist = new List<Location>();
while (queryResultSetIterator.HasMoreResults)
{
FeedResponse<Location> currentResultSet = await queryResultSetIterator.ReadNextAsync();
foreach (Location x in currentResultSet)
{
mylist.Add(x);
Console.WriteLine("\tRead {0}\n", x);
}
}
}
}

Key points of the implementation:

  • On the GetStartedDemoAsync the connection with the Cosmos DB is initialized using the connection strings and the database and container names. Its important to use the connectionMode Gateway because you will maybe face connection issues.
  • The function AddItemsToContainerAsync is used to insert values on the database. A common issue happens with the PartitionKey that is mandatory to be used on the CreateItemAsync function. In my case I use a random Guid value for it. You should define a JsonProperty on your model with the PartitionKey value and provide a value along with your data. On my Location loc constructor I append a new Guid as the Id value.
  • The QueryItemsAsync is used to retrieve the database values in a structure as your model.

The partition key is used to distribute your data into logical partition for scalability reasons. You should consider choosing an better value that is not random in order to take advantage of the Cosmos DB indexing engine.

Inside Task Main I used a while loop in order to insert some data on the cosmos DB database. As I do not have an external API source for the locations, the same location is added over and over again.

while(true)
{
await AddItemsToContainerAsync();
Thread.Sleep(5000);
}

Retrieving the values from the database.

Posted on Leave a comment

Build Service Fabric .NET applications with CMD and Azure DevOps

In this guide I will explain how to build a service fabric solution using cmd and also Azure DevOps to automate your deployments.

Given that you already have in place your Service Fabric solution, you should edit and add the below Target directive on your .sfproj file inside your visual studio solution.

This is needed in order to create the package that will be deployed on the service fabric cluster.

<Target Name="ForcePackageTarget" AfterTargets="Build" Condition="'$(ForcePackageTarget)' =='true'">
    <CallTarget Targets="Package"/>
  </Target>

That’s all. With this option enabled you can now perform a build using the msbuild tool. You should edit servicefabric.sln to reflect your project name.

msbuild servicefabric.sln /t:Build /p:ForcePackageTarget=true /p:Configuration=Debug /p:Platform=x64

The package output will be located on solution/pkg folder depending on your build configuration specified on the command line (Debug, Release).

In order to automate this procedure, you will have to create your pipeline and place it on your repository.

Three steps are needed in order to build your service fabric solution.

  • Firstly you should download the latest .NET version if your project targets .NET 6. If not, then you should select another version.
  • Secondly you should restore your Nuget packages on your solution in order to reference any services that come with the application.
  • The third step is the actual build using the msbuild task.

The example pipeline is shown below:

trigger:
- none

pr: none
pool:
  vmImage: windows-latest

steps:
- task: UseDotNet@2
  inputs:
    packageType: sdk
    version: '6.0.x'


- task: NuGetCommand@2
  inputs:
    command: 'restore'
    restoreSolution: '**/*.sln'
    feedsToUse: 'select'

- task: MSBuild@1
  inputs:
    solution: '**\*.sln'
    msbuildArchitecture: 'x64'
    configuration: 'release'
    msbuildArguments: '/p:ForcePackageTarget=true'
    clean: true

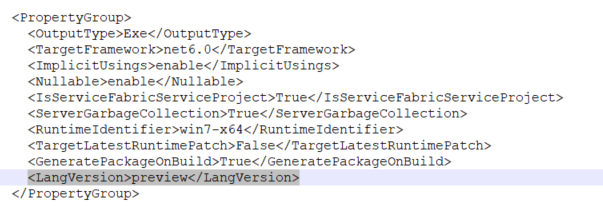
In order to get this pipeline working with .NET 6, you should edit Stateless1.csproj and add also LangVersion.

The output of the build will be located on pkg folder.

Finally you could create a release pipeline and upload the artifacts pkg directory on your service fabric cluster.

Microsoft Documentation for service fabric deployments:

https://docs.microsoft.com/en-us/azure/service-fabric/service-fabric-package-apps

Youtube video: