In this article I will demonstrate how one can create different environments for development needs through terraform modules. Modules provide great extensibility and code reuse. In this example I will use an appservice resource on Azure cloud.
The result of the deployment will be two different resource groups with two app services. The code of the demonstration is located at the bottom of the page.
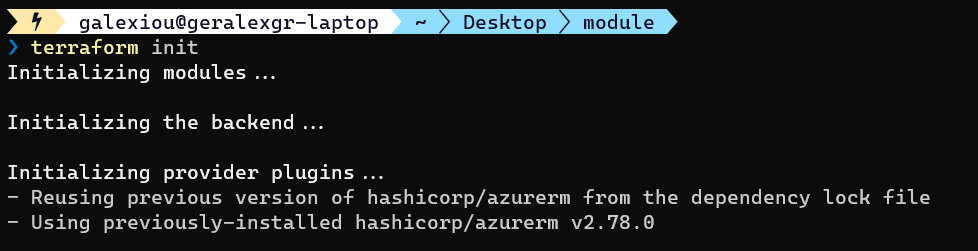
You should first init your module. Navigate to the module folder and perform init
cd modules; terraform init
cd .. ; terraform init
Then validate your terraform code
terraform validate
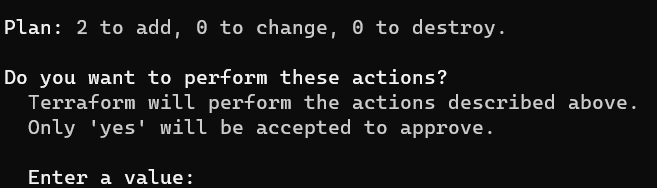
The last step is to apply your configuration
terraform apply
You may encounter an error during the creation of the resources because of the app service name. It should be globally unique.
Change your name and perform a terraform apply again. Terraform will read your .tfstate file and will only implement the differences on infrastructure.
After the successful run you will see the green result output from terraform cli.
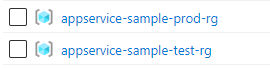
On Azure there should be two resource groups created. One for prod environment and one for test.
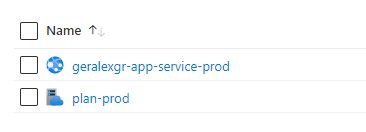
Inside each resource group there should be a different app service the one that it is created through the module according with the settings provided.
Terraform is one of the best automation providers for DevOps purposes used by hundred of Engineers. It is an open source tool that can be used by anyone for free. In this article I will explain how to deploy windows and linux virtual machines on Azure using a Terraform template.
First things first you will need to have the az cli installed. Then you will have to set your subscription on your current powershell session.
az account set --subscription "12abc123-4567-1234-12345-asdr4334fsd"
Then you will need to create an app role assignment for your subscription. This will be used from terraform for the provision of the resources.
az ad sp create-for-rbac --role="Contributor" --scopes="/subscriptions/12abc123-4567-1234-12345-asdr4334fsd"
That’s all. You can now deploy your resources through terraform. In the links below I have provided my Github repository along with instructions for the template use.
A tricky part of the deployment is the vm image selection. In order to locate the available azure images names you can use:
Its a common thing for DevOps engineers to define some agent pools that hold agents and organize their deployments through those pools. I have worked with this approach as well by defining Uat and Prod pools that are used from build and release pipelines.
In this article I will explain how to use the environment resources that are located under Pipelines section.
Environments are a collection of resources on Azure DevOps through which you can define your deployment strategy, approvals and conditions. An environment could be a custom one, or a predefined like a virtual machine or Kubernetes cluster.
It is important to understand the difference between an agent pool and an environment as you have the option to run a deployment job with an environment that has no resources.
This is possible because environments are the scope at which you define pre-deployment checks (approvals, gates, etc). Deploying to resources defined in an environment is an option, not a requirement.
As an example, if you have a serverless Azure web app, you use an environment to define the approvals and gates required to deploy to that environment, but then actual deployment activities occur on an agent from an agent pool because an Azure Web App doesn’t have any physical machines to deploy to.
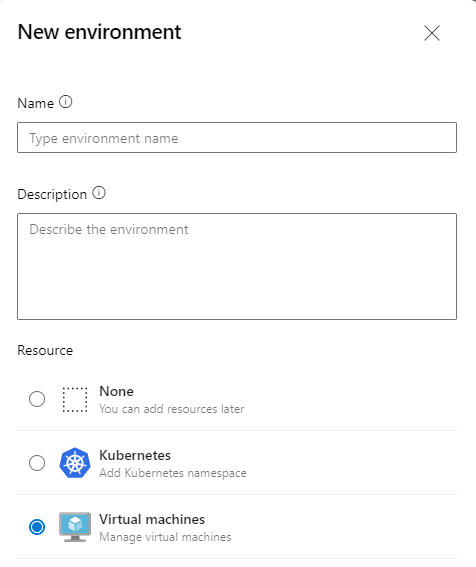
Lets now examine how you could create your own environments to define your strategies. From environments select add new environment
In my case I will select windows virtual machines as I will use common windows servers as deployment machines.
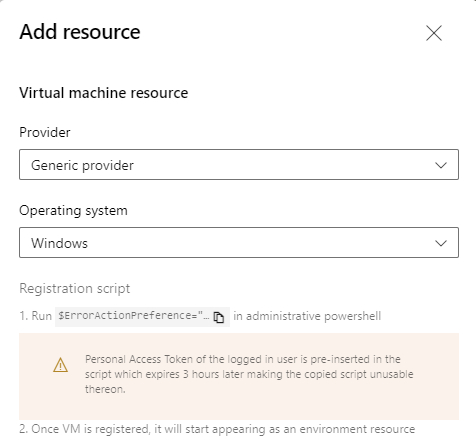
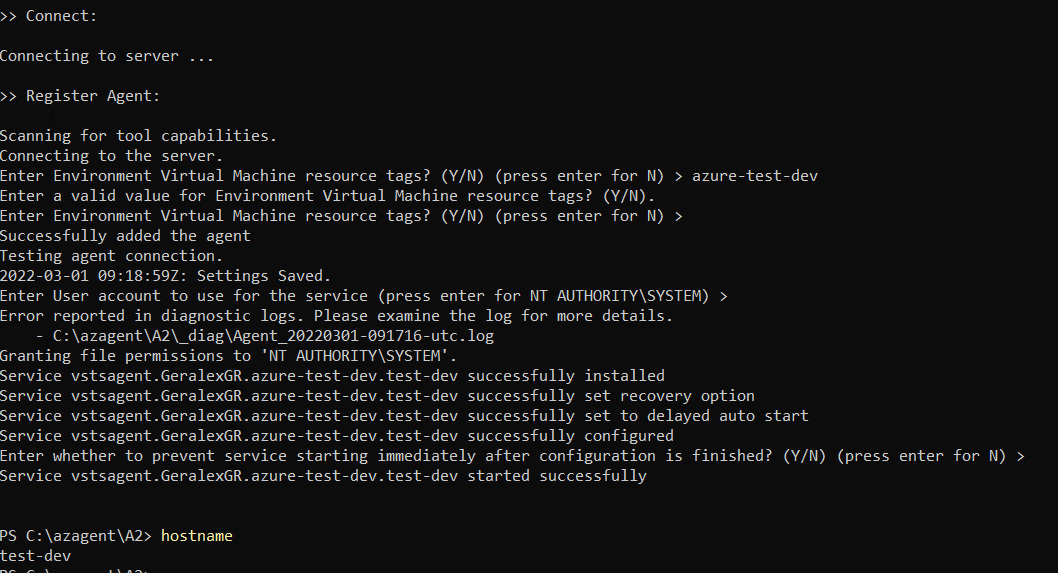
Then the registration script will be provided to register your machine as an Azure DevOps agent so that jobs can run on those environments. If you use empty environments just for approvals you will not have to run scripts or install an azure devops agent.
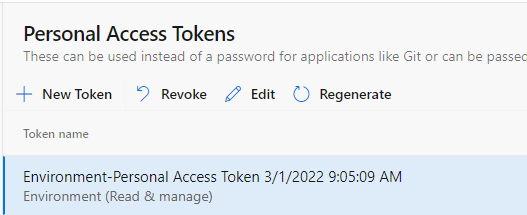
Azure DevOps will automatically create a Personal Access Token for the agent registration. You can either create a new one, or use the created one. Keep in mind that the life timespan of this token will be three hours. If you want to have the agent alive, you can extend the expiration time of the token.
You will have to save the script as .ps1 on your target machine and run it as administrator.
$ErrorActionPreference="Stop";If(-NOT ([Security.Principal.WindowsPrincipal][Security.Principal.WindowsIdentity]::GetCurrent() ).IsInRole( [Security.Principal.WindowsBuiltInRole] "Administrator")){ throw "Run command in an administrator PowerShell prompt"};If($PSVersionTable.PSVersion -lt (New-Object System.Version("3.0"))){ throw "The minimum version of Windows PowerShell that is required by the script (3.0) does not match the currently running version of Windows PowerShell." };If(-NOT (Test-Path $env:SystemDrive\'azagent')){mkdir $env:SystemDrive\'azagent'}; cd $env:SystemDrive\'azagent'; for($i=1; $i -lt 100; $i++).....
During the configuration I proceeded with the default values. (just press enter)
When you finish with the configuration of your agents you will have the recources listed under your environment. In my case those are two virtual machines, test-qa and test-dev
Lets now define a deployment strategy. You can choose between the rolling, runOnce, canary deployments. Each of them are explained on the documentation article that I have included on the bottom of the page.
runOnce is the simplest deployment strategy and most steps are executed once. (preDeploy, deploy, routeTraffic)
A rolling deployment replaces instances of the previous version of an application with instances of the new version of the application on a fixed set of virtual machines (rolling set) in each iteration
Canary deployment strategy is an advanced deployment strategy that helps mitigate the risk involved in rolling out new versions of applications. By using this strategy, you can roll out the changes to a small subset of servers first. As you gain more confidence in the new version, you can release it to more servers in your infrastructure and route more traffic to it.
In the below pipeline I added a rolling strategy. The max parallel execution percentage is 50% this means that the deployment will be executed first on my dev server and then on my qa server after all tasks of the dev are finished. The deployment test task will create a file and paste some text on it.
trigger:
- none

pool:
  vmImage: ubuntu-latest

stages:
- stage: deployment
  displayName: Deploy on Environment
  jobs:
  - deployment: VMDeploy
    displayName: Deploy to VM
    environment:
      name: azure-test-dev
      resourceType: VirtualMachine
    strategy:
      rolling:
        maxParallel: 50%
        preDeploy:
          steps:
          - script: echo running pre deployment steps
        deploy:
          steps:
            - script: echo running rolling strategy on windows servers > C:\output
Strategy sequence:
Dev server -> predeploy step
Dev server -> deploy step
When the deployment for the dev server is completed then the qa server deployment will start.
QA server -> predeploy step
QA server -> deploy step
You can also define approvals and checks for your stages on the deployments. For example you could define a stage to be deployed only during working hours or from a specific branch.
Lastly you should give access to the environment from the pipeline that you created.