Posted on Leave a comment

Automatically update your GitHub repositories with a powershell script

Developers often have a lot of repositories stored on their local machines. These repositories get updated from other developers and they stay outdated. In many cases developers forget to fetch and pull the latest changes on those repositories and when they commit code, the IDE will notify of the new changes. When this is the case, the commit will get an non explanatory message as the latest of the commit and you will have to navigate on the actual commit to verify the changes and commit message.

Commit message
Merge branch test/v3.0.0 of https://github.com/org/repository

In order to resolve this issue, you can create a powershell script that can automatically fetch the latest changes of your local repositories. You will need to change your repositories base location.

#change your github location
$github_directory = "C:\Users\galexiou\Documents\GitHub"
Get-ChildItem $github_directory | ForEach-Object {
if($_.Attributes -eq "Directory")
{
Write-Host $_.FullName
Set-Location $_.FullName
git fetch
git pull
}
}

As you can see from the output below this script will go and fetch the latest changes on the repositories that have been updated.

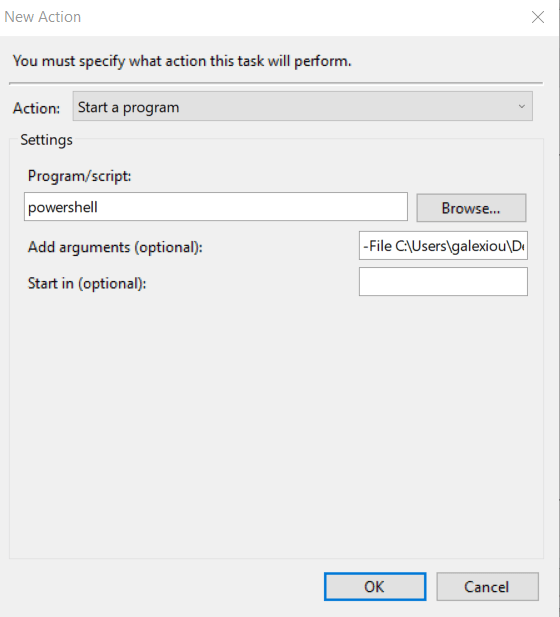
You can also create a cron job or an automated windows task in order to run this job automatically on computer startup or on your work schedule start. For example

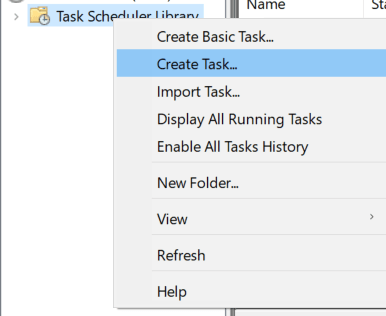
On task scheduler press create task

and select your triggers (when this task will run) along with the action. This will be the run of the powershell script. On the argument you must specify the -File location (where you stored your powershell script).

Posted on Leave a comment

Build pipeline on tag push – Azure DevOps build triggers

There are multiple ways to define your continuous integration trigger on a pipeline depending on your needs. One common approach is to trigger a build whenever a new merge or push is done on your branch.

For example with the below notation you could trigger a new build every time a new push is merged on the uat branch.

trigger:
- uat

Another approach could be the pull request. Every time a new pull request is created for a specific branch your build could be initiated. In order to accomplish that you should use the pr keyword.

The below example will trigger when a new pull request is created and the merge destination is main branch. This approach could help you identify if the code of a specific feature/branch actually builds and can be merged on your main branch.

pr:
  branches:
    include:
    - main

Another approach is the tags functionality. You could run a build only if a specific tag is pushed along with the commit.

The below example will only build when the tag release.* is pushed on the branch on which the pipeline is located.

trigger:
  tags:
    include:
    - release.*

Some tags that could trigger my build are: release.v1 , release.master, release.v2

In order to push a tag on your branch using cmd you should

git add .
git commit -m "commit message"
git tag mytag
git push --tags

Then on tags section of your repository you can locate your new tag.

Documentation of triggers for Azure pipelines:

https://docs.microsoft.com/en-us/azure/devops/pipelines/yaml-schema/trigger?view=azure-pipelines

Video tutorial on YouTube:

Posted on 1 Comment

CI/CD build pipeline for .NET solutions using Cake2 – Azure Devops

In a previous article Build .NET solutions/projects using cake 2 I described how you can build a .NET solution using cake 2. In this tutorial I will explain how you can create your continuous integration pipeline to build your projects automatically with cake 2 and a build agent.

You should first store your project on a git repository. For the purposes of this demo I will choose Azure Devops. I first clone the repository and add the appropriate code. Then I push back to the remote.

Git commands:

git add
git commit -m "added code"
git push

Then under main branch the src folder will be located. In this folder the code is placed.

The second step is to create the pipeline and store it in the repository. Press new pipeline and then select your Azure Repos Git.

Then choose the starter pipeline on which we will add some tasks.

The code for the pipeline is just a simple powershell script that will execute the cake build command as we examined on the previous article.

trigger:
- main

pool:
  vmImage: ubuntu-latest
steps:

- task: PowerShell@2
  displayName: Build step using cake
  inputs:
    targetType: 'inline'
    script: 'dotnet cake'
    workingDirectory: '$(Build.SourcesDirectory	)/src/'

When I tried to build my application although the procedure started, I got an error about the targeting SDK.

You can resolve this by specifying your requested DotNet version.

- task: UseDotNet@2
  displayName: Use .NET 6
  inputs:
    version: '6.0.x'
    includePreviewVersions: true

Finally the build will be successful.

The final pipeline will be the below:

trigger:
- none

pr: none

pool:
  vmImage: ubuntu-latest
steps:

- task: PowerShell@2
  displayName: install cake tool
  inputs:
    targetType: 'inline'
    script: 'dotnet tool install Cake.Tool --version 2.0.0 --global'

- task: UseDotNet@2
  displayName: Use .NET 6
  inputs:
    version: '6.0.x'
    includePreviewVersions: true

- task: PowerShell@2
  displayName: Build step using cake
  inputs:
    targetType: 'inline'
    script: 'dotnet cake'
    workingDirectory: '$(Build.SourcesDirectory)/src/'
Posted on 1 Comment

Build .NET solutions/projects using cake 2

Cake is a powerful tool that implements build functionality for various .NET solutions. It can extend your build with custom parameters and values that you want to reference on a CI/CD pipeline or in your metadata. In this article I will demonstrate how to use cake in order to build your .NET solution.

First create a Console App or another .NET solution that you want to build.

create a new console application

For this demonstration I will use the default template that is provided from cake website. You should rename and point to your solution name, in my case the solution is named ConsoleApp1.

The default build script includes three tasks.

  • The first one cleans output of previous builds.
  • The second one will build your application
  • The third will run .net tests.

In the build script provided below, I have provided as configuration Debug. You can change this value on the configuration line.

var target = Argument("target", "Build");
var configuration = Argument("configuration", "Debug");

//////////////////////////////////////////////////////////////////////
// TASKS
//////////////////////////////////////////////////////////////////////


Information("Beginning cleaning application.....");
Task("Clean")
    .WithCriteria(c => HasArgument("rebuild"))
    .Does(() =>
{
    CleanDirectory($"./bin/{configuration}");
});

Information("Beginning building application.....");

Task("Build")
    .IsDependentOn("Clean")
    .Does(() =>
{
    DotNetCoreBuild("./ConsoleApp1.sln", new DotNetCoreBuildSettings
    {
        Configuration = configuration,
    });
});


Information("DotNetCoreTest task .....");

Task("Test")
    .IsDependentOn("Build")
    .Does(() =>
{
    DotNetCoreTest("./ConsoleApp1.sln", new DotNetCoreTestSettings
    {
        Configuration = configuration,
        NoBuild = true,
    });
});

//////////////////////////////////////////////////////////////////////
// EXECUTION
//////////////////////////////////////////////////////////////////////

RunTarget(target);

In order to build you should place the above file on your solution directory with the name build.cake. Then you will have to run dotnet cake and the build will run.

build output

https://cakebuild.net/