Posted on Leave a comment

How Azure DevOps pipelines agent works

Azure DevOps agent is the tool on which the automation pipelines will run. Microsoft has already created predefined agent pool (macos, ubuntu, linux) for administrators to run their pipelines. These agent pools can be selected using the vmImage instruction.

pool:
vmImage: 'windows-latest' or 'ubuntu-latest' or 'macos-latest'

I have already documented the DevOps agent creation procedure and can be found on the below URL.

During the installation, the agent working directory should be selected. This is the installation path, where the pipelines files will be stored during the execution. Lets say for example that you select the C:\agent directory. During the installation a folder named work will be created and also some other folders as _diag, bin, externals. Inside the _diag folder the logs for the agent are saved.

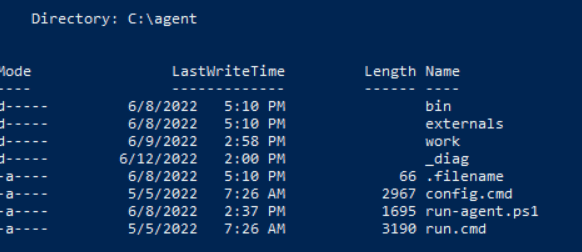
As a result if you need to troubleshoot an Azure DevOps agent you should investigate the logs under C:\agent\_diag

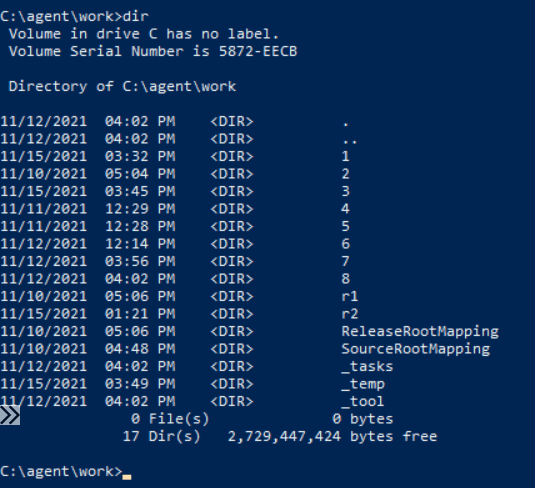
Inside the work folder the pipeline files that are necessary for the runs are saved. For every pipeline run a new ID is created that will store all the files that are necessary for this run. This will be the run working directory and it is isolated between different runs. The numbers represent a build pipeline run and folders that begin with the letter r represent a release pipeline run.

Build pipelines -> Numbers
Release pipelines -> rNumber

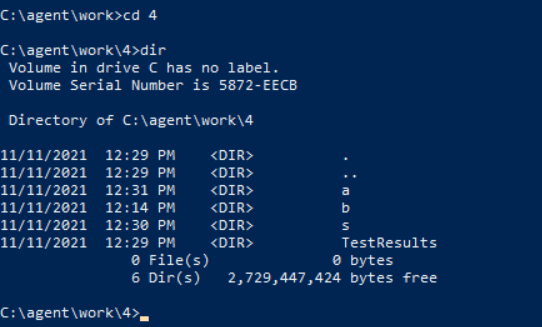
Inside the pipeline working directory there is also a sub hierarchy with three folders (a, b, s). 

The a folder is used for the artifacts and can be used to place output files. 
The b folder is used for builds
The s folder is used for the source code checkout of repositories. 

You can access these folders using the predefined variables. For example you can find the a folder with $(Build.ArtifactStagingDirectory) or the sources folder using $(Build.SourcesDirectory)

These predefined variables will let you interact with the building and publishing procedure and you should avoid using static entries like indicating the path itself (best practices) 

Predefined variables — Azure Pipelines | Microsoft Docs

Posted on 1 Comment

Enable Diagnostic settings for Azure App service using terraform loop

Imagine that you want to enable diagnostic settings for multiple app services on Azure using terraform. The required options can be located under Monitoring tab.

A appropriate rule option should be created to indicate where the logs should be sent. 

The available categories can be located below and I will instruct terraform to enable them all.

In order to accomplish that through terraform I used a loop. The depends_on keyword is used because firstly the app services should be created and then the diagnostic settings for them. Create a file like app_diagnostics.tf and place it inside your terraform working directory.

resource "azurerm_monitor_diagnostic_setting" "diag_settings_app" {
  depends_on = [ azurerm_windows_web_app.app_service1,azurerm_windows_web_app.app_service2 ]
  count = length(local.app_service_ids)
  name               = "diag-rule"
  target_resource_id = local.app_service_ids[count.index]
  log_analytics_workspace_id = local.log_analytics_workspace_id
  
  dynamic "log" {
    iterator = entry
    for_each = local.log_analytics_log_categories
    content {
        category = entry.value
        enabled  = true

        retention_policy {
      enabled = false
        }
    }
   
  }

  metric {
    category = "AllMetrics"

    retention_policy {
      enabled = false
      days = 30
    }
  }

}

Inside locals.tf I have created a variable that holds the app services ids, the log analytics workspace ID on which the logs will be sent and also the categories which I want to enable on Diagnostics. As shown on the first screenshot all the categories are selected.

locals {

 log_analytics_workspace_id = "/subscriptions/.../geralexgr-logs" 
 log_analytics_log_categories     = ["AppServiceHTTPLogs", "AppServiceConsoleLogs","AppServiceAppLogs","AppServiceAuditLogs","AppServiceIPSecAuditLogs","AppServicePlatformLogs"]

app_service_ids = [azurerm_windows_web_app.app_service1.id,azurerm_windows_web_app.app_service2.id]
}

As a result the loop will enable for every app service you add on app_service_ids each Diagnostic category placed on log_analytics_log_categories variable.

Posted on Leave a comment

The for_each value depends on resource attributes that cannot be determined until apply, so Terraform cannot predict how many instances will be created.

When working with terraform loops you may encounter the error that is shown below.

The “for_each” value depends on resource attributes that cannot be determined until apply, so Terraform cannot predict how many instances will be created.

I faced this particular issue when I tried to dynamically create a azurerm_monitor_diagnostic_setting resource for multiple web apps.

The for_each code is shown below:

resource "azurerm_monitor_diagnostic_setting" "diag_settings_app" {
  depends_on = [ azurerm_windows_web_app.app_service1,azurerm_windows_web_app.app_service2 ]
  for_each = toset(local.app_service_ids)
  name               = "diag-rule"
  target_resource_id = each.value
  log_analytics_workspace_id = local.log_analytics_workspace_id
  
  dynamic "log" {
    iterator = entry
    for_each = local.log_analytics_log_categories
    content {
        category = entry.value
        enabled  = true

        retention_policy {
      enabled = false
        }
    }
   
  }

  metric {
    category = "AllMetrics"

    retention_policy {
      enabled = false
      days = 30
    }
  }

}

The local.app_service_ids defines the app services IDs.

app_service_ids = [azurerm_windows_web_app.app_service1.id,azurerm_windows_web_app.app_service2.id]

In order to override this issue I used count loop instead.

resource "azurerm_monitor_diagnostic_setting" "diag_settings_app" {
  depends_on = [ azurerm_windows_web_app.app_service1,azurerm_windows_web_app.app_service2 ]
  count = length(local.app_service_ids)
  name               = "diag-rule"
  target_resource_id = local.app_service_ids[count.index]
  log_analytics_workspace_id = local.log_analytics_workspace_id
  
  dynamic "log" {
    iterator = entry
    for_each = local.log_analytics_log_categories
    content {
        category = entry.value
        enabled  = true

        retention_policy {
      enabled = false
        }
    }
   
  }

  metric {
    category = "AllMetrics"

    retention_policy {
      enabled = false
      days = 30
    }
  }

}

terraform apply will then work:

Posted on 4 Comments

Pass parameters from Power automate to Azure DevOps pipeline using rest api

Recently I had to implement the scenario that is depicted below.

In more detail I had to implement a way to get user input (usernames) in order to pass this information on an Azure DevOps pipeline and through this pipeline make some actions on Azure through az cli.

For the described solution I used the below services:

  • Azure Devops
  • Power Automate
  • Azure DevOps rest API
  • Azure

The first thing that I created was the form. In this form the user has to provide the input of the usernames in a requested format in order to pass this information on the later components.

Then I created a new power automate flow that would handle the input of this form and make a POST request on Azure DevOps api in order to trigger a build pipeline with the parameters of the form as input.

The flow and the task that have been used are depicted below.

Select response ID on the form.

On the POST request you should enter your details regarding the pipeline ID, organization and project. The body of the request should be as shown in order to get the parameters parsed correctly.

The azure devops pipeline will have as an input parameter and empty object.

trigger: none
pr: none 
pool:
  vmImage: windows-latest

parameters:
  - name: users
    type: object
    default: []

jobs:
  - job: vdi
    displayName: rest api pipeline
    steps:
      
    - ${{ each user in parameters.users }}:
      - task: PowerShell@2
        inputs:
          targetType: 'inline'
          script: |        
            Write-Host "${{user}}"
          

When user submits the form

then the power app will run

and as a result the azure devops pipeline will be triggered through the rest api.

Finally the pipeline will parse the parameters provided by the form.