Posted on Leave a comment

Extend xfs disk with parted command line – grow xfs partition

This article describes how to extend a physical disk which is formatted as XFS if LVM is not an option.

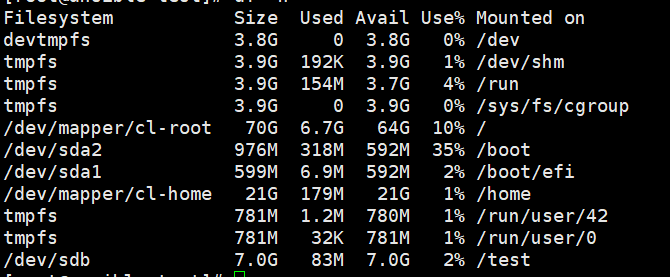
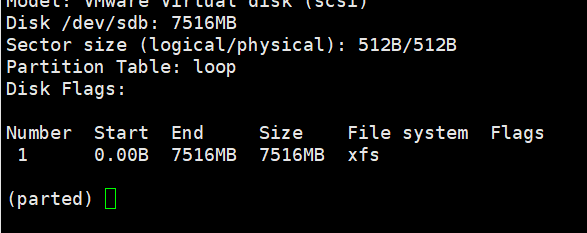
As shown below the /dev/sdb device is formatted as xfs and mounted under /test. Currently its capacity is 7GB.

locate the existing disk.

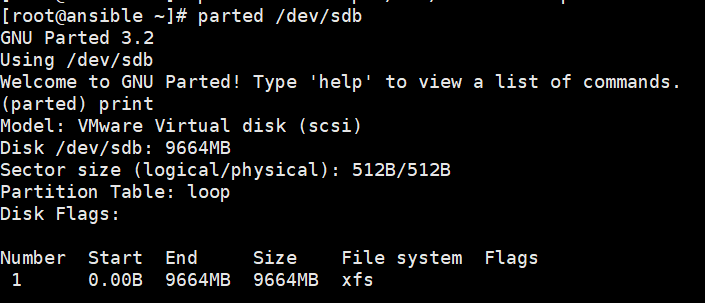
Lets extend the physical volume device by adding 2GB more on it.

extend disk on hypervisor

However capacity will not be extended on Linux because the physical disk need to be extended also with parted. As you can see the partition number is 1 and it is needed for the next commands.

parted /dev/sdb

Execute the below command:

parted -s -a opt /dev/sdb "resizepart 1 100%"

If not unmounted you will get the below warning. Proceed with the umount

umount /dev/sdb

Execute again the command for resizing. You should now have a successful result.

Verify the new capacity:

physical disk extended

Mount disk and grow its size

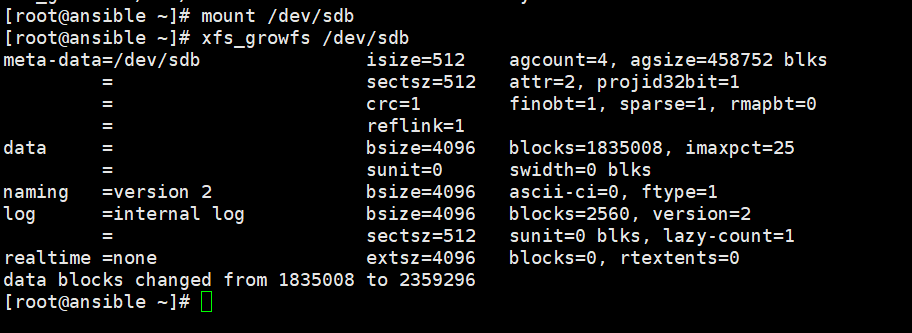
Verify the new capacity on the operating system

Posted on Leave a comment

Combine Windows and Linux inventory hosts on Ansible for Logging purposes

Lets assume you have configured ansible on multiple Windows hosts in order to massively perform patches installation or execute commands. As explained in detail on my previous articles in order to be successful the connection method must be set as winrm (see below)

 ansible_connection = winrm
 ansible_winrm_server_cert_validation = ignore
 ansible_user = administrator
 ansible_password = 
 ansible_become_user = administrator
 ansible_become_method = runas

However if you state this connection method, you cannot connect to linux machines and delegate tasks. One example of this scenario is a windows patching mechanism with wsus and ansible. You can deploy the patches using winrm method but you cannot log output on your localhost as the connection must be changed to ssh.

In order to bypass this problem I added a new group on my inventory for localhost entry for which I specify the connection method and user

[local]
localhost ansible_connection=ssh ansible_become_user=root ansible_become_method=sudo ansible_user=root

Then one will be able to perform a logging action with the below task.

 name: write output to file
   shell: echo "{{ result.stdout }}" >> /root/ansible/something.log
   delegate_to: localhost 

Result is the registered output of the patching procedure.

I am using shell command in order to append a new entry every time I have a result from my previous actions.

Posted on Leave a comment

Ansible Privilege Escalation win_command – refresh Windows Update Service

When you have ansible deployed it is easy to perform massively actions on your inventory hosts. On a previous article I have explained in detail how you can easily manage Windows machines with Ansible.

In order to refresh Windows update service and make it connect to WSUS reporting console one should execute the below commands on a range of machines.

wuauclt /resetauthorization
wuauclt /reportnow
wuauclt /detectnow

In order to perform this task automated and avoid logging in on each machine, you can execute the below playbook.

---
- name: deploy commands on servers
 hosts: test
 become: true
 tasks:
 name: win_command resetauth
 win_command: wuauclt /resetauthorization
 name: win_command report
 win_command: wuauclt /reportnow
 name: win_command detect
 win_command: wuauclt /detectnow 

If you run this playbook without elevated privileges, it will fail. The necessary variables that must be included in your inventory or another appropriate location are listed below (folder variables, etc). The become keyword is a must but the escalation method must be changed instead of sudo as we handle windows machines.

 [all:vars]
 ansible_connection = winrm
 ansible_user = administrator
 ansible_become_user=administrator
 ansible_become_method=runas
Posted on Leave a comment

Configuring firewalld on Linux systems – zone creation

Firewalld is the default firewall module on newer Linux distributions that replaced its ancestor iptables.

One of its biggest advantage is firewall-cmd tool that makes easy to configure your own policies/zones through command line.

When installed, firewalld should be enabled and started.

systemctl enable firewalld; systemctl start firewalld

The default zone that is configured after installation is public on which the default network interface is added.

You can get a list of services allowed with the command:

firewall-cmd --zone=public --list-all

For the sake of the article we will create a new zone and allow some services on it.

Create a new zone with:

firewall-cmd --permanent --new-zone=custom

Make custom zone your default:

firewall-cmd --set-default-zone=custom

Reload firewalld module so that changes take place. Everytime you need to change a firewall setting a reload must take place.

systemctl reload firewalld

Add a custom ssh or application port on your created zone

firewall-cmd --permanent --add-port=11233/tcp --zone=custom

Add a build in service with a known port:

firewall-cmd --permanent --add-service=https --zone=custom

Add an IP address that could access your zone:

firewall-cmd --permanent --zone=custom --add-source=192.168.1.254