Posted on Leave a comment

Insert and retrieve data on Azure cosmos DB – C# SDK

Azure Cosmos DB is a database solution provided from Microsoft Azure that provides 99.999% SLA for enterprise level solutions.

In this article I will demonstrate how you can write a simple .NET application to insert and fetch data from a Cosmos DB.

First things first, you should have already a cosmos DB created. Then you will need to navigate in the keys section on Azure and retrieve your connection keys.

Using data explorer on Azure you can easily create new Databases and Containers. Containers are like Tables, but they also include other entities like Stored Procedures Triggers and User Defined Functions.

In my test I created a new Database named Data on which I created the table Locations. In this location table I wanted to append some location entries, that they will contain Longitude and Latitude.

That is why I created a class inside my Console App named Location

    public class Location
    {
        public Double Longtitude { get; set; }
        public Double Latitude { get; set; }
        [JsonProperty(PropertyName = "id")]
        public string Id { get; set; }
    }

My Program.cs is shown below:

using System;
using System.Threading.Tasks;
using System.Configuration;
using System.Collections.Generic;
using System.Net;
using Microsoft.Azure.Cosmos;
using cosmos;
using System.Timers;
public class Program
{
public static readonly string EndpointUri = "";
public static readonly string PrimaryKey = "";
public static CosmosClient cosmosClient;
public static Database database;
public static Container container;
static async Task Main(string[] args)
{
await GetStartedDemoAsync();
await QueryItemsAsync();
// insert test data with a timer.
//while(true)
//{
// await AddItemsToContainerAsync();
// Thread.Sleep(5000);
//}
}
private static async Task GetStartedDemoAsync()
{
var options = new CosmosClientOptions() { ConnectionMode = ConnectionMode.Gateway };
cosmosClient = new CosmosClient(EndpointUri, PrimaryKey,options);
database = cosmosClient.GetDatabase("Data");
container = database.GetContainer("Locations");
}
private static async Task AddItemsToContainerAsync()
{
cosmos.Location loc = new cosmos.Location
{
Latitude = 12.222222,
Longtitude = 15.555555,
Id = Guid.NewGuid().ToString()
};
ItemResponse<Location> loc_response = await container.CreateItemAsync<Location>( loc, new PartitionKey(loc.Id ));
Console.WriteLine("Created item in database with id: {0} Operation consumed {1} RUs.\n", loc_response.Resource, loc_response.RequestCharge);
}
private static async Task QueryItemsAsync()
{
var sqlQueryText = "SELECT * FROM Items";
QueryDefinition queryDefinition = new QueryDefinition(sqlQueryText);
FeedIterator<Location> queryResultSetIterator = container.GetItemQueryIterator<Location>(queryDefinition);
List<Location> mylist = new List<Location>();
while (queryResultSetIterator.HasMoreResults)
{
FeedResponse<Location> currentResultSet = await queryResultSetIterator.ReadNextAsync();
foreach (Location x in currentResultSet)
{
mylist.Add(x);
Console.WriteLine("\tRead {0}\n", x);
}
}
}
}

Key points of the implementation:

  • On the GetStartedDemoAsync the connection with the Cosmos DB is initialized using the connection strings and the database and container names. Its important to use the connectionMode Gateway because you will maybe face connection issues.
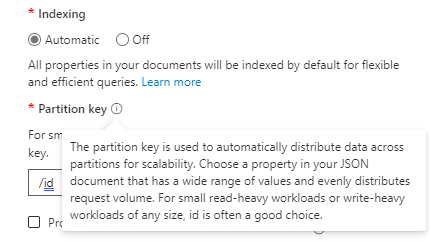
  • The function AddItemsToContainerAsync is used to insert values on the database. A common issue happens with the PartitionKey that is mandatory to be used on the CreateItemAsync function. In my case I use a random Guid value for it. You should define a JsonProperty on your model with the PartitionKey value and provide a value along with your data. On my Location loc constructor I append a new Guid as the Id value.
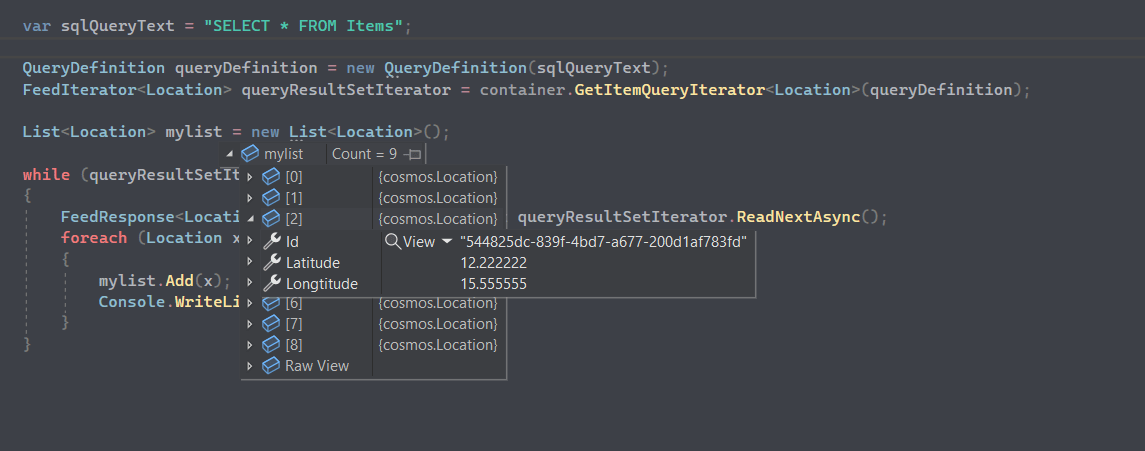
  • The QueryItemsAsync is used to retrieve the database values in a structure as your model.

The partition key is used to distribute your data into logical partition for scalability reasons. You should consider choosing an better value that is not random in order to take advantage of the Cosmos DB indexing engine.

Inside Task Main I used a while loop in order to insert some data on the cosmos DB database. As I do not have an external API source for the locations, the same location is added over and over again.

while(true)
{
await AddItemsToContainerAsync();
Thread.Sleep(5000);
}

Retrieving the values from the database.

Posted on Leave a comment

Run Unit tests for .NET applications – Azure DevOps

In this article I will demonstrate how one can write and integrate Unit tests on .NET solutions and automate the testing procedure through Azure DevOps.

For my scenario I have a simple Console App .NET application inside a solution with the name ConsoleApp1. This solution includes also another project, the TestProject1 which is of type MSTest project.

My ConcoleApp only contains a simple function that adds two numbers. The code is shown below as well as the solution structure.

The unit test methods are also simple and will verify whether the add function works properly. The TestMethod1 will verify if the int input is correct, and the second one will fail as I try to evaluate a string with an int value.

In order to build the tests you should right click on TestProject1 and press run tests.

By checking the output we can verify that the UnitTest1 was successful in comparison with UnitTest2 which failed.

Lets now examine how to automate the procedure of the build and test using Azure DevOps. The first step is to upload the solution on a source control site and integrate Azure DevOps with it. I have already documented the procedure on a previous article build-pipeline-for-net-solutions-using-cake2-azure-devops

My pipeline contains two stages, one for the build of the project and one for the run of unit tests. The code is available below:

pool:
  vmImage: ubuntu-latest

trigger: none
pr: none 

stages:

  - stage:
    displayName: Build .NET application
    jobs:
      - job:
        displayName: build job
        steps:
          - task: UseDotNet@2
            displayName: Use .NET6 to build
            inputs:
              version: '6.0.x'
              includePreviewVersions: true
          - task: DotNetCoreCLI@2
            displayName: Building Visual studio solution
            inputs:
              command: 'build'
              projects: '**/*.csproj'
              arguments: '--configuration debug'

  - stage: 
    displayName: Run unit tests
    jobs:
      - job:
        displayName: unit tests job
        steps:
          - task: DotNetCoreCLI@2
            displayName: Run Visual studio tests
            inputs:
              command: test
              projects: '**/*Test*/*.csproj'
              arguments: '--configuration debug'

As you can verify the tests stage failed because of the unit test that was not successful.

Azure DevOps also can give you an overview of how many tests succeeded. In my case I had 50% success rate because 1 out of 2 tests failed.

By pressing the 50% tests button you can also get a detailed review of the tests.

In more detail the method that fails is TestMethod2 and the exact message points to the comparison between the int and string values.

Video tutorial on YouTube:

Posted on 1 Comment

CI/CD build pipeline for .NET solutions using Cake2 – Azure Devops

In a previous article Build .NET solutions/projects using cake 2 I described how you can build a .NET solution using cake 2. In this tutorial I will explain how you can create your continuous integration pipeline to build your projects automatically with cake 2 and a build agent.

You should first store your project on a git repository. For the purposes of this demo I will choose Azure Devops. I first clone the repository and add the appropriate code. Then I push back to the remote.

Git commands:

git add
git commit -m "added code"
git push

Then under main branch the src folder will be located. In this folder the code is placed.

The second step is to create the pipeline and store it in the repository. Press new pipeline and then select your Azure Repos Git.

Then choose the starter pipeline on which we will add some tasks.

The code for the pipeline is just a simple powershell script that will execute the cake build command as we examined on the previous article.

trigger:
- main

pool:
  vmImage: ubuntu-latest
steps:

- task: PowerShell@2
  displayName: Build step using cake
  inputs:
    targetType: 'inline'
    script: 'dotnet cake'
    workingDirectory: '$(Build.SourcesDirectory	)/src/'

When I tried to build my application although the procedure started, I got an error about the targeting SDK.

You can resolve this by specifying your requested DotNet version.

- task: UseDotNet@2
  displayName: Use .NET 6
  inputs:
    version: '6.0.x'
    includePreviewVersions: true

Finally the build will be successful.

The final pipeline will be the below:

trigger:
- none

pr: none

pool:
  vmImage: ubuntu-latest
steps:

- task: PowerShell@2
  displayName: install cake tool
  inputs:
    targetType: 'inline'
    script: 'dotnet tool install Cake.Tool --version 2.0.0 --global'

- task: UseDotNet@2
  displayName: Use .NET 6
  inputs:
    version: '6.0.x'
    includePreviewVersions: true

- task: PowerShell@2
  displayName: Build step using cake
  inputs:
    targetType: 'inline'
    script: 'dotnet cake'
    workingDirectory: '$(Build.SourcesDirectory)/src/'
Posted on 1 Comment

Build .NET solutions/projects using cake 2

Cake is a powerful tool that implements build functionality for various .NET solutions. It can extend your build with custom parameters and values that you want to reference on a CI/CD pipeline or in your metadata. In this article I will demonstrate how to use cake in order to build your .NET solution.

First create a Console App or another .NET solution that you want to build.

create a new console application

For this demonstration I will use the default template that is provided from cake website. You should rename and point to your solution name, in my case the solution is named ConsoleApp1.

The default build script includes three tasks.

  • The first one cleans output of previous builds.
  • The second one will build your application
  • The third will run .net tests.

In the build script provided below, I have provided as configuration Debug. You can change this value on the configuration line.

var target = Argument("target", "Build");
var configuration = Argument("configuration", "Debug");

//////////////////////////////////////////////////////////////////////
// TASKS
//////////////////////////////////////////////////////////////////////


Information("Beginning cleaning application.....");
Task("Clean")
    .WithCriteria(c => HasArgument("rebuild"))
    .Does(() =>
{
    CleanDirectory($"./bin/{configuration}");
});

Information("Beginning building application.....");

Task("Build")
    .IsDependentOn("Clean")
    .Does(() =>
{
    DotNetCoreBuild("./ConsoleApp1.sln", new DotNetCoreBuildSettings
    {
        Configuration = configuration,
    });
});


Information("DotNetCoreTest task .....");

Task("Test")
    .IsDependentOn("Build")
    .Does(() =>
{
    DotNetCoreTest("./ConsoleApp1.sln", new DotNetCoreTestSettings
    {
        Configuration = configuration,
        NoBuild = true,
    });
});

//////////////////////////////////////////////////////////////////////
// EXECUTION
//////////////////////////////////////////////////////////////////////

RunTarget(target);

In order to build you should place the above file on your solution directory with the name build.cake. Then you will have to run dotnet cake and the build will run.

build output

https://cakebuild.net/