Stages on Azure devops can be a powerful tool when it comes to complex environments as you can divide the deployment process into different logical units. For example you could have different stages for different environments like Uat, Dev, Production or you could separate functionality for different products or technology stacks like FrontEnd, Backend, Mobile etc.
In this article we will examine the dependsOn keyword that creates dependencies between various stages and indicates which should run first and what will be the sequence.
Main scenario
We have an application that is created from various components/microservices. Those components need to be compiled in one or more binaries and be exported for release in our platform/hosting provider. In order to deploy our application we will need to first compile all those dependencies, export them and later on use them in the release tasks.
Example 1
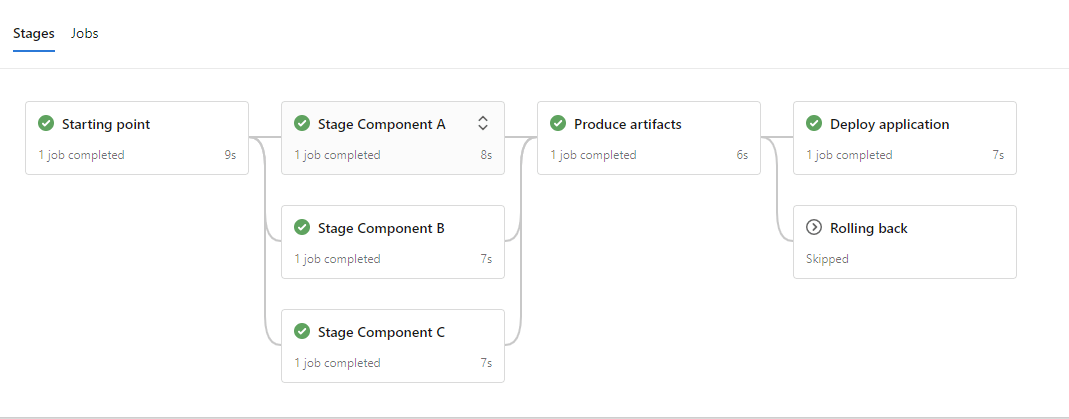
In the below example we have starting point which will be some initialization for our environment. Then we continue with the build steps that will be the components A, B, C and then we need to produce the artifacts. The artifacts stage need to wait for all three components stages to be completed so we use dependsOn and provide as a list all the component stages. After the artifact stage we evaluate the result and if we have a success we deploy the application in a new stage otherwise we perform a rollback. Rollback and deploy application will be executed only if the condition of the stage is true so as to create a branching logic.
When you need to depend ON more than one stages you can provide those as a list
Code
trigger:
- none

pool:
  vmImage: ubuntu-latest

stages:
- stage: Stage_Starting_Point
  displayName: Starting point
  jobs:
  - job: Starting_point_Job
    displayName:  Starting_point_Job
    steps:
    - script: echo pre processing
      displayName: pre processing

- stage: Stage_Comp_A
  dependsOn: Stage_Starting_Point
  displayName: Stage Component A
  jobs:
  - job: Job_Comp_A
    displayName:  Job Component A
    steps:
    - script: echo building Component A
      displayName: build component A

- stage: Stage_Comp_B

  displayName: Stage Component B
  dependsOn: Stage_Starting_Point
  jobs:
  - job: Job_Comp_B
    displayName:  Job Component B
    steps:
    - script: echo building Component B
      displayName: build component B

- stage: Stage_Comp_C
  dependsOn: Stage_Starting_Point
  displayName: Stage Component C
  jobs:
  - job: Job_Comp_C
    displayName:  Job Component C
    steps:
    - script: echo building Component C
      displayName: build component C

- stage: Stage_Artifacts
  dependsOn:
  - Stage_Comp_A
  - Stage_Comp_B
  - Stage_Comp_C
  displayName: Produce artifacts
  jobs:
  - job: Job_Artifacts
    displayName:  Job Artifacts
    steps:
    - script: echo producing artifacts
      displayName: producing artifacts

- stage: Stage_Deploy_Prod
  dependsOn: Stage_Artifacts
  condition: succeeded('Stage_Artifacts')
  displayName: Deploy application Prod
  jobs:
  - job: Job_Deploy_Prod
    displayName:  Job Deployment
    steps:
    - script: echo deploying
      displayName: deploying application Prod

- stage: Stage_Rollback
  dependsOn: Stage_Artifacts
  condition: failed('Stage_Artifacts')
  displayName: Rolling back
  jobs:
  - job: Job_Rollback
    displayName:  Job Rollback
    steps:
    - script: echo rolling back application
      displayName: roll back
Example 2
The second example will be the same as previous one with one small difference. After the deploy for the production environment we want to deploy also on the Disaster recovery environment. For this scenario we depend on production stage and also the rollback stage, but as we see from the output we have the final stage skipped.
You can specify the conditions under which each stage, job, or step runs. By default, a job or stage runs if it does not depend on any other job or stage, or if all of the jobs or stages that it depends on have completed and succeeded
As a result deploy application DR stage will run only if we remove the dependency from the roll back stage. As the rollback stage is skipped, the final stage is also skipped.

Code
trigger:
- none

pool:
  vmImage: ubuntu-latest

stages:
- stage: Stage_Starting_Point
  displayName: Starting point
  jobs:
  - job: Starting_point_Job
    displayName:  Starting_point_Job
    steps:
    - script: echo pre processing
      displayName: pre processing

- stage: Stage_Comp_A
  dependsOn: Stage_Starting_Point
  displayName: Stage Component A
  jobs:
  - job: Job_Comp_A
    displayName:  Job Component A
    steps:
    - script: echo building Component A
      displayName: build component A

- stage: Stage_Comp_B

  displayName: Stage Component B
  dependsOn: Stage_Starting_Point
  jobs:
  - job: Job_Comp_B
    displayName:  Job Component B
    steps:
    - script: echo building Component B
      displayName: build component B

- stage: Stage_Comp_C
  dependsOn: Stage_Starting_Point
  displayName: Stage Component C
  jobs:
  - job: Job_Comp_C
    displayName:  Job Component C
    steps:
    - script: echo building Component C
      displayName: build component C

- stage: Stage_Artifacts
  dependsOn:
  - Stage_Comp_A
  - Stage_Comp_B
  - Stage_Comp_C
  displayName: Produce artifacts
  jobs:
  - job: Job_Artifacts
    displayName:  Job Artifacts
    steps:
    - script: echo producing artifacts
      displayName: producing artifacts

- stage: Stage_Deploy_Prod
  dependsOn: Stage_Artifacts
  condition: succeeded('Stage_Artifacts')
  displayName: Deploy application Prod
  jobs:
  - job: Job_Deploy_Prod
    displayName:  Job Deployment
    steps:
    - script: echo deploying
      displayName: deploying application Prod

- stage: Stage_Rollback
  dependsOn: Stage_Artifacts
  condition: failed('Stage_Artifacts')
  displayName: Rolling back
  jobs:
  - job: Job_Rollback
    displayName:  Job Rollback
    steps:
    - script: echo rolling back application
      displayName: roll back

- stage: Stage_Deploy_DR
  dependsOn:
  - Stage_Rollback
  - Stage_Deploy_Prod
  displayName: Deploy application DR
  jobs:
  - job: Job_Deploy_DR
    displayName:  Job Deployment
    steps:
    - script: echo deploying
      displayName: deploying application DR
Microsoft Docs:
https://learn.microsoft.com/en-us/azure/devops/pipelines/process/conditions?view=azure-devops&tabs=yaml
Youtube video:


