Posted on 1 Comment

Consume php backend nested array on a C# Application – Json.NET

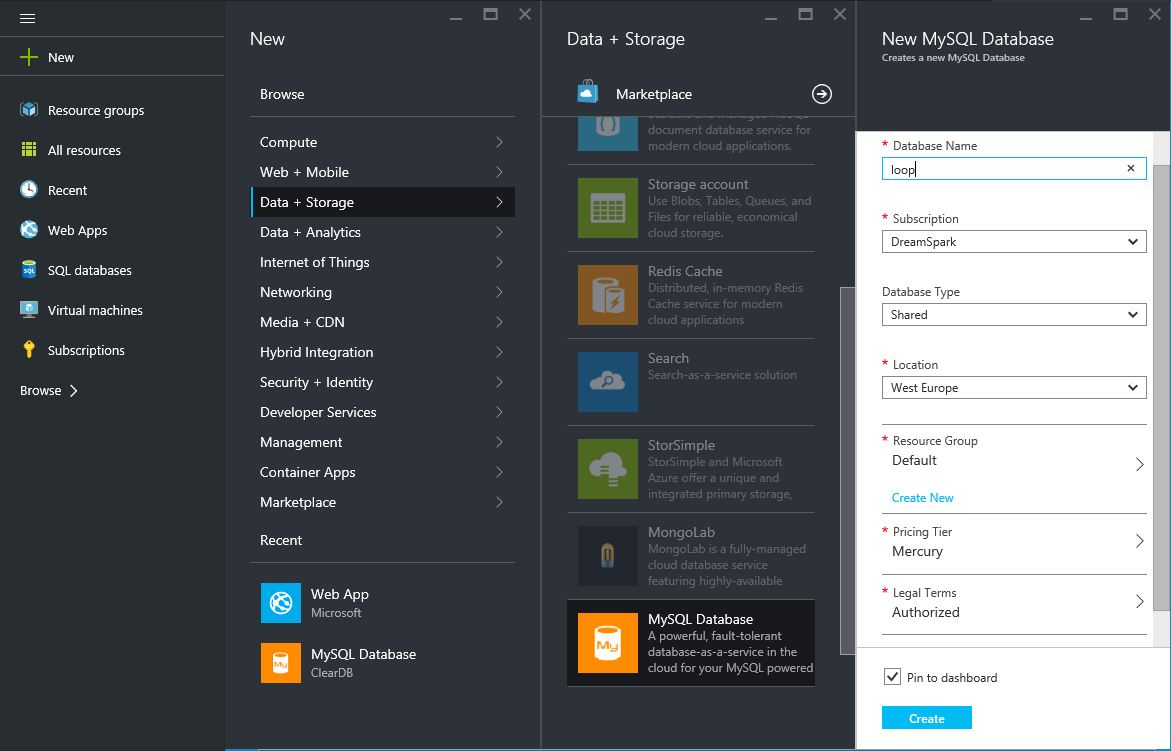
Lets assume you got a MYSQL database that contains data for your application and you want to consume this information on a C# Application in order to handle it on a client.

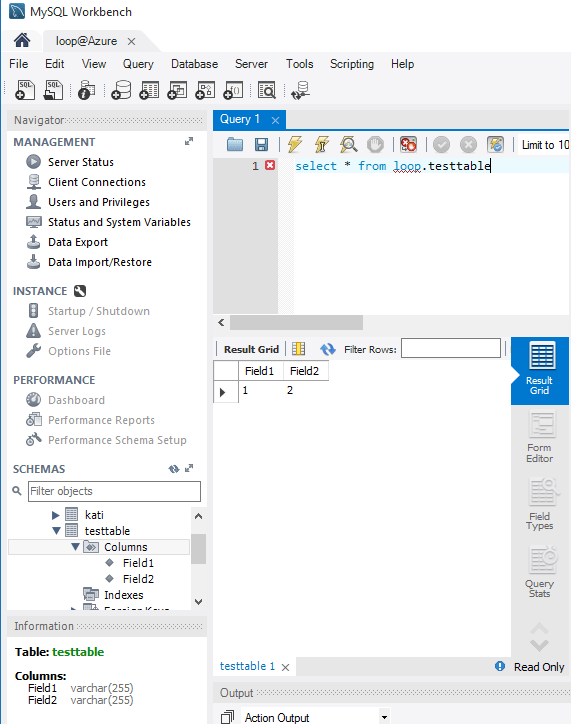
For the sake of this example the following table will be parsed

As depicted the following information is returned from the api:

  • the state of the response (succeeded or not)
  • a message that will show the response result
  • the actual result that in this case is a list of trips

Each trip contains id, fromlocation, tolocation, date and time properties that have to be returned to the application.

The php code that was used to create the data from the database is the following:

         $trips =array();
         while ( $row = $stmt->fetch() ) {         
         $obj["id"]= $row['id'];
         $obj['fromlocation']= $row['fromlocation'];
         $obj['tolocation'] = $row['tolocation'];       
         $obj['date']= $row['date'];
         $obj['time'] = $row['time'];         
         array_push($trips,$obj);
         }

         $response["success"] = 1;
         $response["message"] = "Trips returned successfully!";
         $response["trips"] = $trips;
         die(json_encode($response));

So in order to parse this json result we will need a plugin like Newtonsoft.Json

The class that will be used to encapsulate the response would be the following:

public class GetTrips
    {
        [JsonProperty("success")]
        public int Success { get; set; }

        [JsonProperty("message")]
        public string Message { get; set; }
        [JsonProperty("trips")]
        public Trip[]  Trips { get; set; }

       
        public class Trip
        {
            [JsonProperty("id")]
            public string Id { get; set; }
            [JsonProperty("fromlocation")]
            public string FromLocation { get; set; }
            [JsonProperty("tolocation")]
            public string ToLocation { get; set; }
            [JsonProperty("date")]
            public string Date { get; set; }
            [JsonProperty("time")]
            public string Time { get; set; }
        }

    }

And then we will consume the json response with the following code in C#. In this example data from the API came from a POST request on a web Form.

public async TaskGetTripsAsync(string username,string password)
        {
            try
            {
                var keyValues = new Liststring, string>>
                {
                    new KeyValuePair("username",username),
                    new KeyValuePair("password",password)
                };

                var request = new HttpRequestMessage(HttpMethod.Post, Url);
                request.Content = new FormUrlEncodedContent(keyValues);

                var client = new HttpClient();
                var result = await client.SendAsync(request);
                var content = await result.Content.ReadAsStringAsync();
                var tripsResult = JsonConvert.DeserializeObject (content);
                return tripsResult;
            }
            catch (Exception)
            {
                return null;
            }
        }

Posted on Leave a comment

Extend available properties of User.Identity – Asp.Net [web api]

Asp.net web api by default contains some pre configured fields that can handle the registration of a user in a web app. Some of them are Email, Password, Confirm Password and others. You can extend those properties and include your own for your purposes with the following procedure.

First of all you need to execute some commands in the package manager. You can find nuget package manager in Tools -> Nuget Package Manager -> PM Console 

The first thing to do is to enable Migrations

Enable-Migrations

The you can go to Models\AccountBindingModels.cs and add your property to the class RegisterBindingModel. Also add the same property in the Models\IdentityModels.cs inside ApplicationUser class. For example lets assume you want to add a username in the registration proccess. For this purpose you can use the following line

 public string AppUserName { get; set; }

Also include in the file.

using System;

The you must execute:

Add-Migration "AppUserName"
Update-Database

Those commands will run all the migration files and update the database schema to add a AppUserName column in your database.

Then update the registration action in Controllers\AccountController.cs to store AppUserName as well.

var user = new ApplicationUser() { UserName = model.Email, Email = model.Email, AppUserName = model.AppUserName };

It was that easy. you can finally find AppUserName in your database.

Posted on Leave a comment

SQL queries with PHP on MYSQL database – Azure

A few days ago i activated Azure for students through Dreamspark. I am very happy microsoft give those tools for free in students. After searching the options that are available for free, i found that i could use some mysql databases. As mysql is very common and frequently used, i created a database and wanted to add some data. Unfortunately i couldn’t find a tool for managing the database. As you may know most linux servers come with phpmyadmin pre-installed. So what about Azure?

There are many options for Azure.

  1. You can connect to your database with mysql commands using mysql command line tool.
  2. You can download a GUI tool and do the work (mysql workbench)
  3. You can use any php code to connect.

So here comes this github project with which you can connect on a mysql database that is stored in Azure.

See more details in the below pictures

First of all you must create a mysql database.

new_mysql

After you create the database you must press properties window to see the connection credentials. Those are: Host name, Database Name, Username, Password.

connection

Then you are ready to start using your mysql database. And here comes the PHPqAzure.

As you can see, after entering your credentials you can run your queries. Query result is returned after query is executed.

Example:

Create a test table.


create_table

Add some data

insert

And you are ready. You can see the result with a mysql GUI management tool like Mysql Workbench.

program_view

You can perform as many queries as you want. Make sure your queries executed successfully with the results tab.

If i enter something wrong then the result will inform me for that.

wrong-query