Posted on 1 Comment

CI/CD build pipeline for .NET solutions using Cake2 – Azure Devops

In a previous article Build .NET solutions/projects using cake 2 I described how you can build a .NET solution using cake 2. In this tutorial I will explain how you can create your continuous integration pipeline to build your projects automatically with cake 2 and a build agent.

You should first store your project on a git repository. For the purposes of this demo I will choose Azure Devops. I first clone the repository and add the appropriate code. Then I push back to the remote.

Git commands:

git add
git commit -m "added code"
git push

Then under main branch the src folder will be located. In this folder the code is placed.

The second step is to create the pipeline and store it in the repository. Press new pipeline and then select your Azure Repos Git.

Then choose the starter pipeline on which we will add some tasks.

The code for the pipeline is just a simple powershell script that will execute the cake build command as we examined on the previous article.

trigger:
- main

pool:
  vmImage: ubuntu-latest
steps:

- task: PowerShell@2
  displayName: Build step using cake
  inputs:
    targetType: 'inline'
    script: 'dotnet cake'
    workingDirectory: '$(Build.SourcesDirectory	)/src/'

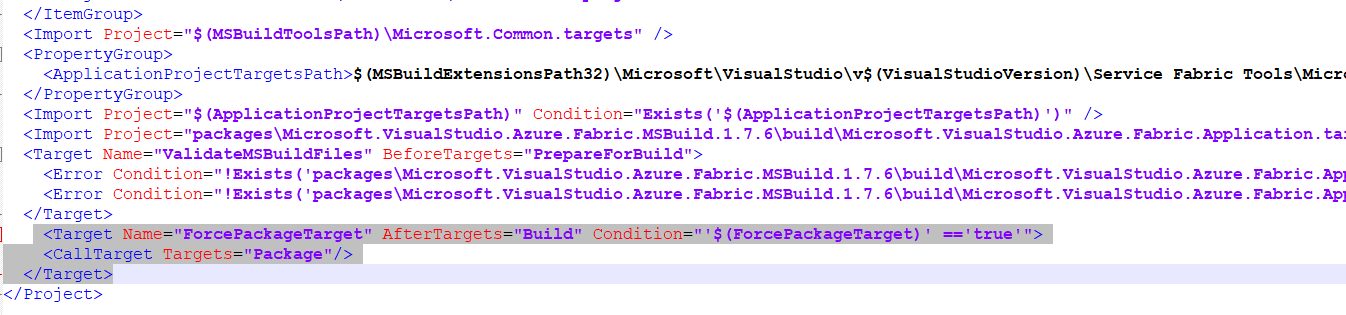
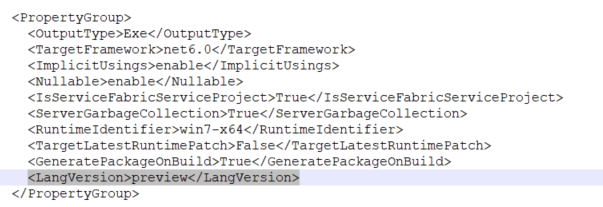
When I tried to build my application although the procedure started, I got an error about the targeting SDK.

You can resolve this by specifying your requested DotNet version.

- task: UseDotNet@2
  displayName: Use .NET 6
  inputs:
    version: '6.0.x'
    includePreviewVersions: true

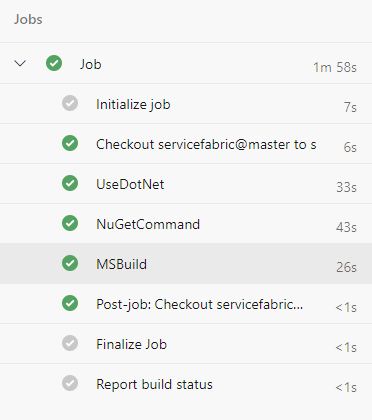
Finally the build will be successful.

The final pipeline will be the below:

trigger:
- none

pr: none

pool:
  vmImage: ubuntu-latest
steps:

- task: PowerShell@2
  displayName: install cake tool
  inputs:
    targetType: 'inline'
    script: 'dotnet tool install Cake.Tool --version 2.0.0 --global'

- task: UseDotNet@2
  displayName: Use .NET 6
  inputs:
    version: '6.0.x'
    includePreviewVersions: true

- task: PowerShell@2
  displayName: Build step using cake
  inputs:
    targetType: 'inline'
    script: 'dotnet cake'
    workingDirectory: '$(Build.SourcesDirectory)/src/'
Posted on 1 Comment

Build .NET solutions/projects using cake 2

Cake is a powerful tool that implements build functionality for various .NET solutions. It can extend your build with custom parameters and values that you want to reference on a CI/CD pipeline or in your metadata. In this article I will demonstrate how to use cake in order to build your .NET solution.

First create a Console App or another .NET solution that you want to build.

create a new console application

For this demonstration I will use the default template that is provided from cake website. You should rename and point to your solution name, in my case the solution is named ConsoleApp1.

The default build script includes three tasks.

  • The first one cleans output of previous builds.
  • The second one will build your application
  • The third will run .net tests.

In the build script provided below, I have provided as configuration Debug. You can change this value on the configuration line.

var target = Argument("target", "Build");
var configuration = Argument("configuration", "Debug");

//////////////////////////////////////////////////////////////////////
// TASKS
//////////////////////////////////////////////////////////////////////


Information("Beginning cleaning application.....");
Task("Clean")
    .WithCriteria(c => HasArgument("rebuild"))
    .Does(() =>
{
    CleanDirectory($"./bin/{configuration}");
});

Information("Beginning building application.....");

Task("Build")
    .IsDependentOn("Clean")
    .Does(() =>
{
    DotNetCoreBuild("./ConsoleApp1.sln", new DotNetCoreBuildSettings
    {
        Configuration = configuration,
    });
});


Information("DotNetCoreTest task .....");

Task("Test")
    .IsDependentOn("Build")
    .Does(() =>
{
    DotNetCoreTest("./ConsoleApp1.sln", new DotNetCoreTestSettings
    {
        Configuration = configuration,
        NoBuild = true,
    });
});

//////////////////////////////////////////////////////////////////////
// EXECUTION
//////////////////////////////////////////////////////////////////////

RunTarget(target);

In order to build you should place the above file on your solution directory with the name build.cake. Then you will have to run dotnet cake and the build will run.

build output

https://cakebuild.net/

Posted on Leave a comment

Error MSB3073 The command “npm run build” exited with code 1 – Visual Studio

Recently I was trying to build a complex project which included also node js code and was deployable to IIS. The error I faced on visual studio during the build was the below.

"npm run build" exited with code 1 - Visual Studio 
"npm install" exited with code 1 - Visual Studio

both of which were misleading.

In order to locate the error I navigated on the Node project and tried to build using

npm run build

Command line never lies. I was able to determine that webpack was not installed.

In order to resolve I executed:

npm install -g webpack
npm install -g webpack-cli
Posted on Leave a comment

Build Service Fabric .NET applications with CMD and Azure DevOps

In this guide I will explain how to build a service fabric solution using cmd and also Azure DevOps to automate your deployments.

Given that you already have in place your Service Fabric solution, you should edit and add the below Target directive on your .sfproj file inside your visual studio solution.

This is needed in order to create the package that will be deployed on the service fabric cluster.

<Target Name="ForcePackageTarget" AfterTargets="Build" Condition="'$(ForcePackageTarget)' =='true'">
    <CallTarget Targets="Package"/>
  </Target>

That’s all. With this option enabled you can now perform a build using the msbuild tool. You should edit servicefabric.sln to reflect your project name.

msbuild servicefabric.sln /t:Build /p:ForcePackageTarget=true /p:Configuration=Debug /p:Platform=x64

The package output will be located on solution/pkg folder depending on your build configuration specified on the command line (Debug, Release).

In order to automate this procedure, you will have to create your pipeline and place it on your repository.

Three steps are needed in order to build your service fabric solution.

  • Firstly you should download the latest .NET version if your project targets .NET 6. If not, then you should select another version.
  • Secondly you should restore your Nuget packages on your solution in order to reference any services that come with the application.
  • The third step is the actual build using the msbuild task.

The example pipeline is shown below:

trigger:
- none

pr: none
pool:
  vmImage: windows-latest

steps:
- task: UseDotNet@2
  inputs:
    packageType: sdk
    version: '6.0.x'


- task: NuGetCommand@2
  inputs:
    command: 'restore'
    restoreSolution: '**/*.sln'
    feedsToUse: 'select'

- task: MSBuild@1
  inputs:
    solution: '**\*.sln'
    msbuildArchitecture: 'x64'
    configuration: 'release'
    msbuildArguments: '/p:ForcePackageTarget=true'
    clean: true

In order to get this pipeline working with .NET 6, you should edit Stateless1.csproj and add also LangVersion.

The output of the build will be located on pkg folder.

Finally you could create a release pipeline and upload the artifacts pkg directory on your service fabric cluster.

Microsoft Documentation for service fabric deployments:

https://docs.microsoft.com/en-us/azure/service-fabric/service-fabric-package-apps

Youtube video: